m (→GameCube Controller Setup: correction?) |
(Heavily modify installation and configuration steps. Fix all spellings of RetroArch not properly capitalized. Update images to new default ozone gui driver. Place images in galleries below steps and reference by number in text to clean up page.) |
||
| Line 3: | Line 3: | ||
RetroArch is the only cross-platform emulator supported by the Ocarina of Time Item Randomizer staff, and the number 1 recommended emulator regardless of platform. It is also possible to use it to play a vast number of platforms other than N64 as well. This might just make it your emulator of choice once you get used to using it. | RetroArch is the only cross-platform emulator supported by the Ocarina of Time Item Randomizer staff, and the number 1 recommended emulator regardless of platform. It is also possible to use it to play a vast number of platforms other than N64 as well. This might just make it your emulator of choice once you get used to using it. | ||
== Installing RetroArch == | |||
[[File:RetroArch-Download-Stable.jpeg|none|thumb|RetroArch Downloads Page and Download Stable button]] | |||
Head over to the [http://www.RetroArch.com/index.php?page=platforms RetroArch downloads page] and click the button labeled <kbd><samp>Download Stable</samp></kbd> Run the installer file it downloads. | |||
== Install | === Windows Specific Installation === | ||
On Windows you may get a popup when trying to run the installer that warns you if you do not have <samp>DirectX 9.0c</samp> installed<sup>1</sup>. Press <kbd><samp>OK</samp></kbd> to continue. Click <kbd><samp>Next ></samp></kbd> until it asks you where you would like to install RetroArch<sup>2</sup>. The default path should be <var>C:\Users\<yourusername>\AppData\Roaming\RetroArch</var>. If it does not display this location it is recommended to copy and paste the following text into the box: <kbd><samp>%AppData%\RetroArch</samp></kbd> and then continue clicking <kbd><samp>Next ></samp></kbd>. Soon you will see the <samp>Choose Components</samp> screen<sup>3</sup>. Make sure you click the checkbox next to <kbd><samp>DirectX 9.0c Runtime</samp></kbd> before clicking <kbd><samp>Next ></samp></kbd>. Keep clicking <kbd><samp>Next ></samp></kbd> until the <samp>Install</samp> button appears. Once you click <kbd><samp>Install</samp></kbd> RetroArch will begin installing. | |||
Before RetroArch finishes installing it should pop up the DirectX installer. Click <kbd><samp>Next ></samp></kbd> until you get to the screen offering to install the Bing Bar<sup>4</sup>. You should uncheck <kbd><samp>Install the Bing Bar</samp></kbd> before clicking <kbd><samp>Next ></samp></kbd>. Once you finish the DirectX installation the RetroArch installation will finish as well. | |||
<gallery> | |||
File:RetroArch-Windows-DirectXWarning.jpeg|1. The DirectX not installed warning. | |||
File:RetroArch-Windows-InstallLocation.jpeg|2. The location you install to should be similar to the one displayed here. Copy the value displayed above if it doesn't. | |||
File:RetroArch-Windows-ChooseComponents.jpeg|3. Make sure DirectX 9.0c Runtime is checked. | |||
File:RetroArch-Windows-DirectXBingBar.jpeg|4. Make sure you uncheck this so you don't end up with software you don't need on your computer. | |||
</gallery> | |||
== Install a RetroArch Core == | |||
You should now be at the <samp>Main Menu</samp> of RetroArch<sup>1</sup>. You can switch between the different menus on the left side of the screen when you are on the top-most sub-menu of a menu. If you can't see the left sidebar with the different menus listed and you need to switch which menu you are in, you can press <kbd>Backspace</kbd>, <kbd>X</kbd>, or the <kbd>Right Mouse Button</kbd> until you see it again. To open a menu, submenu, or option you can press <kbd>Enter</kbd> or <kbd>Z</kbd> while it is highlighted, or <kbd>Left Mouse Button</kbd> while hovering over it. ''Keep in mind that these are the default controls in RetroArch''. If you change these keyboard bindings in the <samp>Settings</samp> menu, you'll have to use the buttons you bound to A or Start to select, and the buttons you bound to B or Back to go back to the previous menu. Using the mouse controls should always work properly, so we will assume you are using them throughout the rest of the guide. | |||
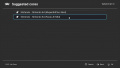
On the <samp>Main Menu</samp> click on the <kbd><samp>Load Core</samp></kbd> option. In the <samp>Load Core</samp> submenu, you will normally see your installed cores. Since you just installed RetroArch you won't see any. Click the <kbd><samp>Download a Core<samp></kbd> option<sup>2</sup>. In the <samp>Core Updater</samp> menu that appears, scroll down to the <samp>Nintendo - Nintendo 64</samp> options. It is recommended that you choose the <samp>Nintendo - Nintendo 64 (ParaLLEl N64)</samp> core option<sup>3</sup>. You can also choose the <samp>Nintendo - Nintendo 64 (Mupen64Plus-Next)</samp> core option if you want, but be aware that the it can have the following issues: [[#Mupen64plus Next Freezes|Mupen64plus Next Freezes]] and [[#Mupen64plus Next Epona Carrots|Mupen64plus Next Epona Carrots]]. '''Windows Users:''' the <samp>Nintendo - Nintendo 64 (Mupen64Plus-Next GLES3)</samp> option should not be chosen. This is a special build of the Mupen64Plus-Next core intended to run on XBox One devices. '''It will not run on Windows PCs'''. | |||
<gallery> | |||
File:RetroArch-InstallCore-MainMenu.jpeg|1. The Main Menu of RetroArch. You'll want to return here often. | |||
File:RetroArch-InstallCore-DownloadCore.jpeg|2. You'll need to download a core before you can play any ROMs. | |||
File:RetroArch-InstallCore-ParaLLEl.jpeg|3. ParaLLEl N64 is known to be the most stable core for the Ocarina of Time Randomizer. | |||
</gallery> | |||
== Configure RetroArch == | == Configure RetroArch == | ||
From the top menu level of the <samp>Main Menu</samp> click on the <kbd><samp>Settings</samp></kbd> menu below the <samp>Main Menu</samp> in the sidebar on the left. Scroll down to <kbd><samp>Saving</samp></kbd> and change <kbd><samp>SaveRAM Autosave Interval</samp></kbd><sup>1</sup> to <kbd><samp>10</samp></kbd> seconds by clicking it, and the scrolling down to <kbd><samp>10 seconds</samp></kbd>. | |||
Next, go back to the <samp>Settings</samp> | Next, go back to the top level menu of <samp>Settings</samp>. Scroll down and select the option <kbd><samp>Directory</samp></kbd><sup>2</sup>. In the menu this opens scroll down and select the option called <kbd><samp>File Browser</samp></kbd><sup>3</sup>. You will be presented with an overview of your system partitions. Navigate through your computer files to the folder you keep your ROMs in. '''They will not show up yet'''. Choose <kbd><samp>Use this directory</samp></kbd><sup>4</sup> anyway. Most browsers will save your randomizer ROM to your Downloads folder by default<sup>5</sup>. However, if you are using the downloaded version of the Ocarina of Time Randomizer the default location for your patched ROMs is a folder called <samp>Output</samp> next to the <samp>.exe</samp> file you double click to start the randomizer. | ||
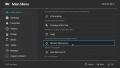
Once you have finished configuring RetroArch you must properly restart it. ''Do not press <kbd>Esc</kbd> or the X in the top right corner.'' Go back to the <kbd><samp>Main Menu</samp></kbd> and move all the way down to the option near the bottom <kbd><samp>Quit RetroArch</kbd></samp><sup>6</sup>. Once you reopen RetroArch go to <kbd><samp>Load Content</samp> ⇒ <samp>Start directory</samp></kbd>. You should now see your ROMs<sup>7</sup>. When you choose one of your ROMs it may ask you which core you want to use if you downloaded more than one of them. It is recommended that you choose <kbd><samp>Nintendo - Nintendo 64 (ParaLLEl N64)</samp></kbd><sup>8</sup> for the most stable experience. | |||
<gallery> | <gallery> | ||
File: | File:RetroArch-Configure-AutoSave.png|1. With this option RetroArch will periodically save your save data to disk. This will prevent most data loss in the event of a crash. | ||
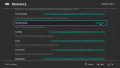
File: | File:RetroArch-Configure-Directory.jpeg|2. This option lets you set where RetroArch saves and looks for various files on your computer. | ||
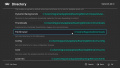
File:RetroArch-Configure-FileBrowser.jpeg|3. File Browser defines the <samp>Start Directory</samp> that RetroArch uses when you are picking your ROM. | |||
File:RetroArch-Configure-UseThisDirectory.jpeg|4. Your ROM files will not show up here! You still want to click <Use this directory> so that they will show up in a couple more steps. | |||
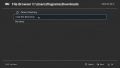
File:RetroArch-Configure-Downloads.jpeg|5. You probably want your File Browser setting to have a similar path to this image. | |||
File:RetroArch-Configure-Restart.jpeg|6. RetroArch will delete any changes you made if you do not restart it properly. Always use this option to ensure your settings get saved. | |||
File:RetroArch-Configure-StartDirectory.jpeg|7. Your ROMs should now appear when you select this menu option if you set your <samp>File Browser</samp> directory properly. If you don't you should go back to that step and try again. | |||
File:RetroArch-Configure-SelectCore.jpeg|8. ParaLLEl N64 core is the most stable core for the Ocarina of Time Randomizer. | |||
</gallery> | </gallery> | ||
== Controller Configuration == | == Controller Configuration == | ||
| Line 53: | Line 57: | ||
After rebooting, make sure the GCN USB Adapter program is '''not''' running. | After rebooting, make sure the GCN USB Adapter program is '''not''' running. | ||
Start | Start RetroArch and go to <kbd><samp>Settings ⇒ Drivers</samp></kbd> and change <samp>Joypad Driver</samp> to <kbd><samp>hid</samp></kbd>. Then use the <kbd><samp>Quit RetroArch</samp></kbd> option in the main menu to properly close RetroArch and save your new configuration. | ||
Do not start the GCN USB Adapter program. Start | Do not start the GCN USB Adapter program. Start RetroArch. You should get a message saying something like <samp>WUP-028 configured in Port #0</samp>. This means that your controller should work now. | ||
=== Remap Your Controls === | === Remap Your Controls === | ||
You'll probably need to customize your controller inputs by loading your ROM and pressing the <kbd>F1</kbd> key to bring up the | You'll probably need to customize your controller inputs by loading your ROM and pressing the <kbd>F1</kbd> key to bring up the RetroArch <samp>Quick Menu</samp>. Choose <kbd><samp>Controls ⇒ Port 1 Controls</samp></kbd>. Highlight the control on your controller on the left side and press <kbd>←</kbd> and <kbd>→</kbd> to cycle through the available N64 controller options on the right side. | ||
Make sure <samp>C-Buttons Mode</samp> is not bound to any of your controls. This is intended for controllers without enough buttons/a right analog stick to map C-Buttons to and usually causes controller issues. | Make sure <samp>C-Buttons Mode</samp> is not bound to any of your controls. This is intended for controllers without enough buttons/a right analog stick to map C-Buttons to and usually causes controller issues. | ||
| Line 69: | Line 73: | ||
*To unbind any button/key hit the <kbd>Delete</kbd> key on your keyboard in the input settings. | *To unbind any button/key hit the <kbd>Delete</kbd> key on your keyboard in the input settings. | ||
*'''Never''' close RA via it’s top right X, close it from far left Main Menu <kbd><samp>Quit | *'''Never''' close RA via it’s top right X, close it from far left Main Menu <kbd><samp>Quit RetroArch</samp></kbd>. | ||
*If you want | *If you want RetroArch to keep running in the background, go over to the <samp>Settings</samp> column in the menu, then down to <samp>User Interface</samp>, hit <kbd>Enter</kbd> and set <samp>Don’t run in the background</samp> to <kbd><samp>OFF</samp></kbd>. | ||
| Line 100: | Line 104: | ||
Go into the <kbd><samp>Settings</samp> ⇒ <samp>Drivers</samp></kbd> menu and change the <samp>Audio Driver</samp> from <samp>xaudio</samp> to <kbd><samp>dsound</samp></kbd>. Then quit RetroArch properly via the Main Menu and restart it. | Go into the <kbd><samp>Settings</samp> ⇒ <samp>Drivers</samp></kbd> menu and change the <samp>Audio Driver</samp> from <samp>xaudio</samp> to <kbd><samp>dsound</samp></kbd>. Then quit RetroArch properly via the Main Menu and restart it. | ||
=== | === RetroArch crash when loading ROM === | ||
If using the <samp>Nintendo - Nintendo 64 (Mupen64Plus)</samp> core, try the <kbd><samp>Nintendo - Nintendo 64 (ParaLLEl N64)</samp></kbd> core instead. If using the <samp>Nintendo - Nintendo 64 (ParaLLEl N64)</samp> core, try the <kbd><samp>Nintendo - Nintendo 64 (Mupen64Plus)</samp></kbd> core instead. | If using the <samp>Nintendo - Nintendo 64 (Mupen64Plus)</samp> core, try the <kbd><samp>Nintendo - Nintendo 64 (ParaLLEl N64)</samp></kbd> core instead. If using the <samp>Nintendo - Nintendo 64 (ParaLLEl N64)</samp> core, try the <kbd><samp>Nintendo - Nintendo 64 (Mupen64Plus)</samp></kbd> core instead. | ||
| Line 120: | Line 124: | ||
=== One of My Buttons Won't Work === | === One of My Buttons Won't Work === | ||
If you messed with the Main Menu User Input Binds you likely configured something wrong. It is not recommended to ever modify controller binds this way unless your controller doesn't have a built in profile. To reset your controller bindings to their default you have to load the default <samp> | If you messed with the Main Menu User Input Binds you likely configured something wrong. It is not recommended to ever modify controller binds this way unless your controller doesn't have a built in profile. To reset your controller bindings to their default you have to load the default <samp>RetroArch.cfg</samp> again. | ||
If you have a ROM loaded, start by pressing <kbd>F1</kbd> to open the <samp>Quick Menu</samp> then press <kbd>Backspace</kbd> to get back to the <samp>Main Menu</samp>. | If you have a ROM loaded, start by pressing <kbd>F1</kbd> to open the <samp>Quick Menu</samp> then press <kbd>Backspace</kbd> to get back to the <samp>Main Menu</samp>. | ||
Go to the far left menu item, <samp>Main Menu</samp>. Move down to '<samp>Configurations</samp> and press <kbd>Enter</kbd>. Select <samp><Parent directory></samp> and hit <kbd>Enter</kbd>. Scroll down to the file <samp> | Go to the far left menu item, <samp>Main Menu</samp>. Move down to '<samp>Configurations</samp> and press <kbd>Enter</kbd>. Select <samp><Parent directory></samp> and hit <kbd>Enter</kbd>. Scroll down to the file <samp>RetroArch.default.cfg</samp> and press <kbd>Enter</kbd>. | ||
=== ParaLLEl Black Screen or Crashes === | === ParaLLEl Black Screen or Crashes === | ||
If you are able to launch the ParaLLEl core but get a black screen, or frequently crash while pausing, try changing the video plugin it is using. Press <kbd>F1</kbd> to open the <samp>Quick Menu</samp> and move down to <samp>Options</samp> and press <kbd>Enter</kbd>. Next, move down to <samp>GFX Plugin</samp> and press the <kbd>→</kbd> arrow key once. Once you have changed the option, press <kbd>Backspace</kbd> twice to return to the <samp>Main Menu</samp> and select <kbd><samp>Quit | If you are able to launch the ParaLLEl core but get a black screen, or frequently crash while pausing, try changing the video plugin it is using. Press <kbd>F1</kbd> to open the <samp>Quick Menu</samp> and move down to <samp>Options</samp> and press <kbd>Enter</kbd>. Next, move down to <samp>GFX Plugin</samp> and press the <kbd>→</kbd> arrow key once. Once you have changed the option, press <kbd>Backspace</kbd> twice to return to the <samp>Main Menu</samp> and select <kbd><samp>Quit RetroArch</samp></kbd> to close RetroArch. Simply run RetroArch and open the ROM again and your ParaLLEl core should be running the new plugin you selected. Try each one and see if any of them work for you. If they do not, you may want to try the mupen64plus Next core instead. | ||
=== My Remapping in Quick Menu Controls Won't Save === | === My Remapping in Quick Menu Controls Won't Save === | ||
If your remapping won't save even after using <kbd><samp>Quit | If your remapping won't save even after using <kbd><samp>Quit RetroArch</samp></kbd> in the main menu, you may have to explicitly save the reamppings. Open the <samp>Quick Menu</samp> with <kbd>F1</kbd>, go down to <kbd><samp>Controls</samp></kbd> and map your controls how you wish. Once you have done so, go back to the <samp>Controls</samp> menu. Near the top of the menu is a <samp>Save Core Remap File</samp> option. Select this to save these controller binds for all randomizer ROMs you open in the future. | ||
Revision as of 03:59, 10 April 2020
by Raizuto
RetroArch is the only cross-platform emulator supported by the Ocarina of Time Item Randomizer staff, and the number 1 recommended emulator regardless of platform. It is also possible to use it to play a vast number of platforms other than N64 as well. This might just make it your emulator of choice once you get used to using it.
Installing RetroArch

Head over to the RetroArch downloads page and click the button labeled Download Stable Run the installer file it downloads.
Windows Specific Installation
On Windows you may get a popup when trying to run the installer that warns you if you do not have DirectX 9.0c installed1. Press OK to continue. Click Next > until it asks you where you would like to install RetroArch2. The default path should be C:\Users\<yourusername>\AppData\Roaming\RetroArch. If it does not display this location it is recommended to copy and paste the following text into the box: %AppData%\RetroArch and then continue clicking Next >. Soon you will see the Choose Components screen3. Make sure you click the checkbox next to DirectX 9.0c Runtime before clicking Next >. Keep clicking Next > until the Install button appears. Once you click Install RetroArch will begin installing.
Before RetroArch finishes installing it should pop up the DirectX installer. Click Next > until you get to the screen offering to install the Bing Bar4. You should uncheck Install the Bing Bar before clicking Next >. Once you finish the DirectX installation the RetroArch installation will finish as well.
-
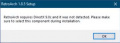
1. The DirectX not installed warning.
-

2. The location you install to should be similar to the one displayed here. Copy the value displayed above if it doesn't.
-
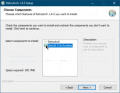
3. Make sure DirectX 9.0c Runtime is checked.
-
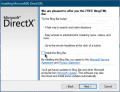
4. Make sure you uncheck this so you don't end up with software you don't need on your computer.


Install a RetroArch Core
You should now be at the Main Menu of RetroArch1. You can switch between the different menus on the left side of the screen when you are on the top-most sub-menu of a menu. If you can't see the left sidebar with the different menus listed and you need to switch which menu you are in, you can press Backspace, X, or the Right Mouse Button until you see it again. To open a menu, submenu, or option you can press Enter or Z while it is highlighted, or Left Mouse Button while hovering over it. Keep in mind that these are the default controls in RetroArch. If you change these keyboard bindings in the Settings menu, you'll have to use the buttons you bound to A or Start to select, and the buttons you bound to B or Back to go back to the previous menu. Using the mouse controls should always work properly, so we will assume you are using them throughout the rest of the guide.
On the Main Menu click on the Load Core option. In the Load Core submenu, you will normally see your installed cores. Since you just installed RetroArch you won't see any. Click the Download a Core option2. In the Core Updater menu that appears, scroll down to the Nintendo - Nintendo 64 options. It is recommended that you choose the Nintendo - Nintendo 64 (ParaLLEl N64) core option3. You can also choose the Nintendo - Nintendo 64 (Mupen64Plus-Next) core option if you want, but be aware that the it can have the following issues: Mupen64plus Next Freezes and Mupen64plus Next Epona Carrots. Windows Users: the Nintendo - Nintendo 64 (Mupen64Plus-Next GLES3) option should not be chosen. This is a special build of the Mupen64Plus-Next core intended to run on XBox One devices. It will not run on Windows PCs.
-
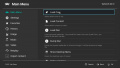
1. The Main Menu of RetroArch. You'll want to return here often.
-
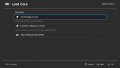
2. You'll need to download a core before you can play any ROMs.
-
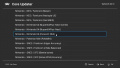
3. ParaLLEl N64 is known to be the most stable core for the Ocarina of Time Randomizer.


Configure RetroArch
From the top menu level of the Main Menu click on the Settings menu below the Main Menu in the sidebar on the left. Scroll down to Saving and change SaveRAM Autosave Interval1 to 10 seconds by clicking it, and the scrolling down to 10 seconds.
Next, go back to the top level menu of Settings. Scroll down and select the option Directory2. In the menu this opens scroll down and select the option called File Browser3. You will be presented with an overview of your system partitions. Navigate through your computer files to the folder you keep your ROMs in. They will not show up yet. Choose Use this directory4 anyway. Most browsers will save your randomizer ROM to your Downloads folder by default5. However, if you are using the downloaded version of the Ocarina of Time Randomizer the default location for your patched ROMs is a folder called Output next to the .exe file you double click to start the randomizer.
Once you have finished configuring RetroArch you must properly restart it. Do not press Esc or the X in the top right corner. Go back to the Main Menu and move all the way down to the option near the bottom Quit RetroArch6. Once you reopen RetroArch go to Load Content ⇒ Start directory. You should now see your ROMs7. When you choose one of your ROMs it may ask you which core you want to use if you downloaded more than one of them. It is recommended that you choose Nintendo - Nintendo 64 (ParaLLEl N64)8 for the most stable experience.
-
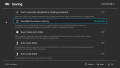
1. With this option RetroArch will periodically save your save data to disk. This will prevent most data loss in the event of a crash.
-
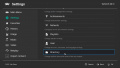
2. This option lets you set where RetroArch saves and looks for various files on your computer.
-
3. File Browser defines the Start Directory that RetroArch uses when you are picking your ROM.
-
4. Your ROM files will not show up here! You still want to click <Use this directory> so that they will show up in a couple more steps.
-
5. You probably want your File Browser setting to have a similar path to this image.
-
6. RetroArch will delete any changes you made if you do not restart it properly. Always use this option to ensure your settings get saved.
-
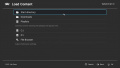
7. Your ROMs should now appear when you select this menu option if you set your File Browser directory properly. If you don't you should go back to that step and try again.
-
8. ParaLLEl N64 core is the most stable core for the Ocarina of Time Randomizer.


Controller Configuration
If your controls don't feel quite right, access the Quick Menu by pressing F1 while a ROM is loaded. Go down to Options and change the Deadzone to 10 and Analog Sensitivity to 80. You may wish to make further personal adjustments as necessary.
GameCube Controller Setup
Before starting, make sure the switch on your adapter is set to Wii-U and not PC.
Go to the Wii U GameCube Adapter driver's website and click Display Install Instructions. Follow steps 1-14. Make sure to follow each step carefully! Afterwards, reboot your PC.
After rebooting, make sure the GCN USB Adapter program is not running.
Start RetroArch and go to Settings ⇒ Drivers and change Joypad Driver to hid. Then use the Quit RetroArch option in the main menu to properly close RetroArch and save your new configuration.
Do not start the GCN USB Adapter program. Start RetroArch. You should get a message saying something like WUP-028 configured in Port #0. This means that your controller should work now.
Remap Your Controls
You'll probably need to customize your controller inputs by loading your ROM and pressing the F1 key to bring up the RetroArch Quick Menu. Choose Controls ⇒ Port 1 Controls. Highlight the control on your controller on the left side and press ← and → to cycle through the available N64 controller options on the right side.
Make sure C-Buttons Mode is not bound to any of your controls. This is intended for controllers without enough buttons/a right analog stick to map C-Buttons to and usually causes controller issues.
HiRes Texture Packs
Keep in mind texture packs are not allowed to be active for races. HiRes Texture Packs
Tips
- To unbind any button/key hit the Delete key on your keyboard in the input settings.
- Never close RA via it’s top right X, close it from far left Main Menu Quit RetroArch.
- If you want RetroArch to keep running in the background, go over to the Settings column in the menu, then down to User Interface, hit Enter and set Don’t run in the background to OFF.
If your controller does not have a default profile or you are using a keyboard, the following information may be helpful.
- Don't alter the Main Menu bindings for controllers that have default profiles. Open the Quick Menu and change the button mapping there instead.
- Left side user input binds (the Delete key will delete any binding)
- B button is equivalent to N64 A Button
- Y button is equivalent to N64 B Button
- L2 button (trigger) is equivalent to N64 Z Button
- L1 is equivalent to N64 L
- R1 is equivalent to N64 R
- Movement:
- Left analog X+ = Right
- Left analog X- = Left
- Left analog Y+ = Down
- Left analog Y- = Up
- C-Buttons/C-Stick:
- Right analog X+ = C-Right
- Right analog X- = C-Left
- Right analog Y+ = C-Down
- Right analog Y- = C-Up
Common Issues
There are several issues that crop up often when new users try out RetroArch.
No Audio
Go into the Settings ⇒ Drivers menu and change the Audio Driver from xaudio to dsound. Then quit RetroArch properly via the Main Menu and restart it.
RetroArch crash when loading ROM
If using the Nintendo - Nintendo 64 (Mupen64Plus) core, try the Nintendo - Nintendo 64 (ParaLLEl N64) core instead. If using the Nintendo - Nintendo 64 (ParaLLEl N64) core, try the Nintendo - Nintendo 64 (Mupen64Plus) core instead.
Mupen64plus Next Freezes
This was an issue with an older version of the mupen64plus Next core. Please update your core to the latest version.
Mupen64plus Next Epona Carrots
This is a side-effect of the quick-fix done to solve the above issue. When this occurs your ability to play the game as normal is slightly hindered, but still playable. To restore normal functionality you will have to save the game, press F1, go down to Close Content and press Enter. This will either close the ROM and emulator core, or crash the emulator. Both outcomes are fine and relaunching the ROM you were playing will no longer have the Epona carrots displaying.
Note: Selecting Restart will not remove the carrot display. This may be due to the core's reset being hardcoded to be a soft reset. You must choose Close Content.
Boots are equipped / Ocarina pulled out randomly while walking
Go to the Settings ⇒ Input ⇒ User 1 Input Binds menu and set Analog to Digital to None
One of My Buttons Won't Work
If you messed with the Main Menu User Input Binds you likely configured something wrong. It is not recommended to ever modify controller binds this way unless your controller doesn't have a built in profile. To reset your controller bindings to their default you have to load the default RetroArch.cfg again.
If you have a ROM loaded, start by pressing F1 to open the Quick Menu then press Backspace to get back to the Main Menu.
Go to the far left menu item, Main Menu. Move down to 'Configurations and press Enter. Select <Parent directory> and hit Enter. Scroll down to the file RetroArch.default.cfg and press Enter.
ParaLLEl Black Screen or Crashes
If you are able to launch the ParaLLEl core but get a black screen, or frequently crash while pausing, try changing the video plugin it is using. Press F1 to open the Quick Menu and move down to Options and press Enter. Next, move down to GFX Plugin and press the → arrow key once. Once you have changed the option, press Backspace twice to return to the Main Menu and select Quit RetroArch to close RetroArch. Simply run RetroArch and open the ROM again and your ParaLLEl core should be running the new plugin you selected. Try each one and see if any of them work for you. If they do not, you may want to try the mupen64plus Next core instead.
My Remapping in Quick Menu Controls Won't Save
If your remapping won't save even after using Quit RetroArch in the main menu, you may have to explicitly save the reamppings. Open the Quick Menu with F1, go down to Controls and map your controls how you wish. Once you have done so, go back to the Controls menu. Near the top of the menu is a Save Core Remap File option. Select this to save these controller binds for all randomizer ROMs you open in the future.