Bizhawk Installation Guide
Instructions
- Download: First you must download Bizhawk and its prerequired files:
Prerequired Files Download
Bizhawk Download
- Extracting: Extract both files after they are done downloading:

- Installing the Pre-Reqs: Open “bizhawk_prereqs_vX.X” and run “bizhawk_prereqs.exe” and go through with it by clicking “Next”.
- Starting the Emulator:Open “BizHawk-X.X.X” and run “EmuHawk.exe”.
- Booting up the Rom: Select “File” and select “Open ROM”. Find your game and load it up!

- Enable RAM Expansion Pak Under the N64 menu that now appears at the top, make sure "Use Expansion Slot" is checked on. If you have to turn it on make sure to restart the core (`Emulation > Reboot Core`) before continuing.
- Better Analog stick accuracy: Provided by Retzioka
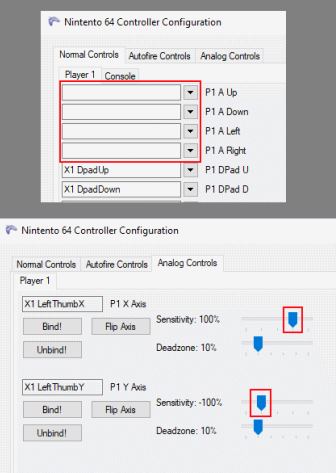
While the game is running, go to the “Config” tab and select the “Controllers..” option. Set up the controls by clicking on the text boxes and input the desired button with your Controller. If it’s not registering the inputs from your Controller, then you are missing drivers for your Controller. Make sure you do not input anything in the 4 first boxes as shown below, as they will mess up your aiming in game when using the Bow / Hookshot / Etc.. Instead, change to the “Analog Controls” tab and click the “Bind” button.
X Axis = Move your stick Left to Right once -- Y Axis = Move your stick Up to Down once.
Also make sure you change the sensitivity of the Y Axis as shown below for easier control over aiming.
Optional Settings
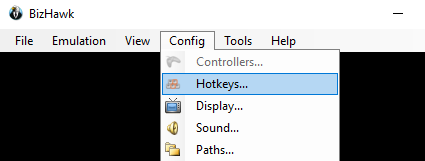
Hotkey Settings
I suggest getting rid of most (if not all) the bound Hotkeys, as some of them can be bound by default to your controller (like fast forward) and be annoying when you play.
Select a hotkey and simply press the "Escape" key on your keyboard.
Better Graphics
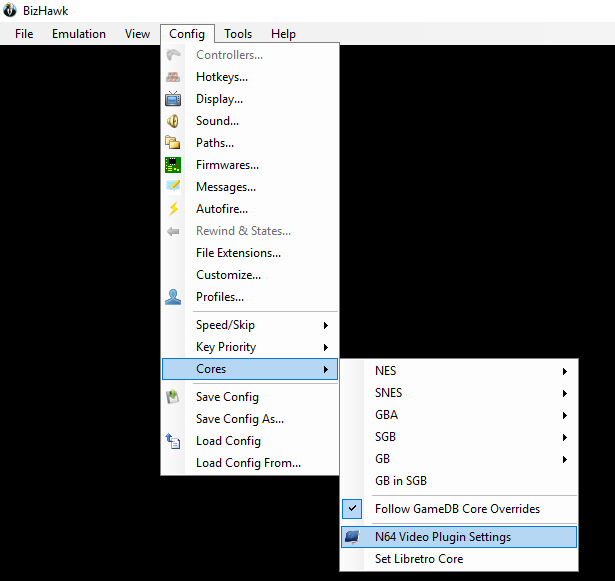
Go to the "Config" tab, select "Cores" and then "N64 Video Plugin Settings".
you should see a third box named "Video Resolution".
640x480 is recommended, but depending on the available PC specs, a higher resolution is possible.
Higher resolutions may affect your FPS and can slow the game down.
Change Active Video Plugin to GlideN64 (If that doesn't work, try Mk2)
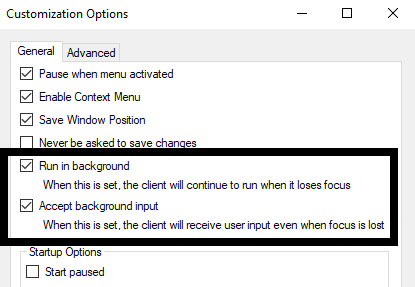
Background Inputs
As a Streamer, you may have to click around often. This will make sure that whatever you do, the Emulator will register the inputs from your Controller.
Go to “Config” and select “Customize..” Make sure the 5th and 6th box are both Checked.
It is also recommended to uncheck the “Pause when Menu Activated” box too.
If you selected a high resolution at #2, your FPS might go down if you click somewhere other than on the Emulator, like a second monitor.
Aspect Ratio
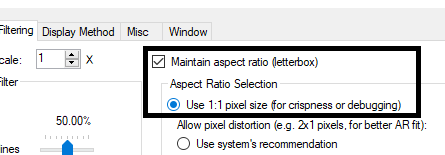
If you decide to make your Emulator’s Window Fullscreen, your game will look stretched, which is not a nice sight for either you or your viewers. This will ensure the game will stay in its original 4:3 Ratio.
Go to “Config” and select “Display”. Check the “Maintain Aspect Ratio (Letterbox)” box and select “Use 1:1 Pixel Size”.
Gamecube Adapter Support
Download the drivers for your WII U Adapter via this link.
Some of you who wishes to use your Gamecube Controller with the Wii U Adapter, connect only the Black USB end of the Wii U Adapter to your PC and connect your Gamecube controllerin the left most slot, then run as an Administrator the “WiiU-UsbSetup 2015-09-02.exe”.
Once the installation starts, a new Window will appear under the name “Zadig”.
In the first box, select “WUP-028” and then select either “Install Driver” or “Reinstall Driver”. It will be the big box in the middle of the Window.
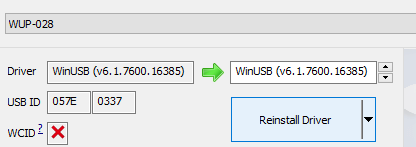
Once done, close this Window with the “X” in the upper right corner, this will make the process keep going. Keep pressing “Next” until the program ask you to Reboot your PC.
After restarting your PC, you will now have a “Wii U USB GCN Adapter” icon (Gamecube Controller looking icon). Open it up as a Administrator and select “Start”.
Your PC will be making several connection noises as if you are plugging and unplugging stuff, this is normal. Let it do it’s thing until you see “Driver Successfully Started, entering input loop”. You will have to repeat this process every time you restart your PC or close the program entirely. If you close this Window, the program will be minimized and will still be running in the background.

Now open up the Emulator “EmuHawk.exe” and start the Game. Go to “Config” and select “Controllers…”. From here, simply click any of the text box and use your Controller to register inputs! This method is also used for the Gamecube / Wii Emulator knowns as “Dolphin”.
If this didn’t work, uninstall and try again. May take 2-3 attempts.
Custom Texture Packs (Optional)
Here is a guide for installing texture packs.
