This page will tell you how to use emulator tools to add items to your inventory. This is useful for fixing bugged or softlocked seeds, resuming after losing a save, recreating issues on seeds without having to play through them, or just for fun.
RAM is temporary memory within a system that holds values currently being used by the running program. Memory is accessed via addresses, which are represented as strings of hexadecimal numbers (more on those later). For our purposes, we are interested in certain addresses in RAM which are the "Save Context" of OoT. The Save Context is everything that is stored when you save your game. It includes things like story and event flags, your current location, how many hearts you have, and importantly for this page, items obtained. Since the save context is checked when the game is deciding what items to place in your inventory, by overwriting the values at these addresses in RAM we can easily give the player items.
Accessing and Using the Hex Editor / Debugger
Bizhawk
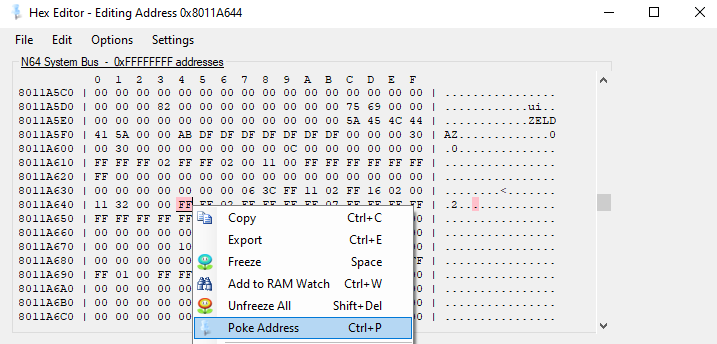
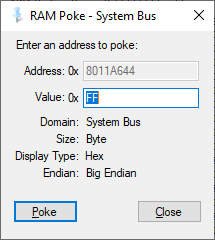
With your ROM loaded, head to Tools ⇒ Hex Editor. A new window should pop up. Next, go to Options ⇒ Memory Domains and select System Bus. Also go to Options ⇒ Data Size and select 1 Byte. Navigate to the relevant address (e.g. 8011A644) by hitting CTRL + G or going to Options ⇒ Go to Address.... To make changes to the RAM, right-click the relevant byte and select Poke Address. In the new window enter the value you want to change the byte to and hit Poke to confirm. Your changes should be reflected in the game immediately.
Project64
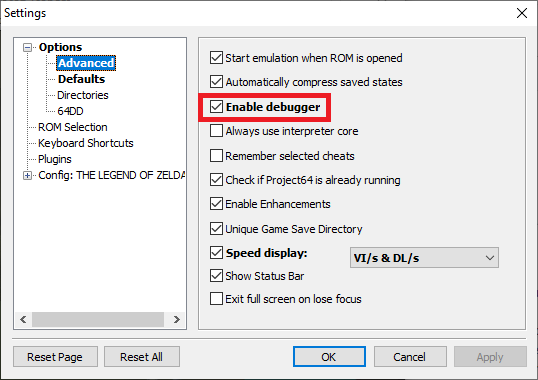
To enable the debugger, go to Options ⇒ Settings... ⇒ Advanced and check Enable debugger. Click Apply.
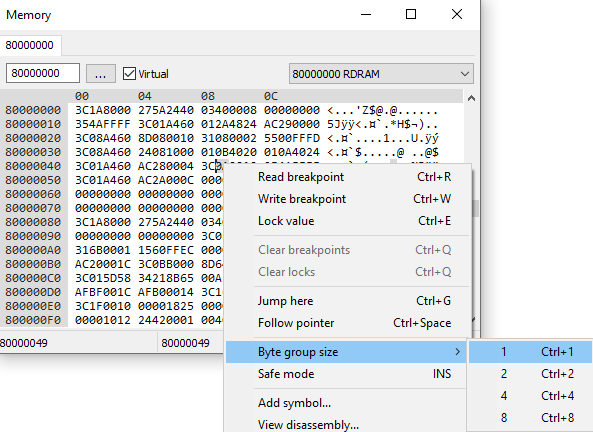
Close the settings window and go to Debugger ⇒ View memory.... A new window should pop up. Right-click any of the bytes in this window and go to Byte group size ⇒ 1. Navigate to the relevant address (e.g. 8011A644) by entering the address in the field in the top left corner of the window. To make your changes, simply select the location where you want to make your change and type in the value. Your changes should be reflected in the game immediately.
Dolphin
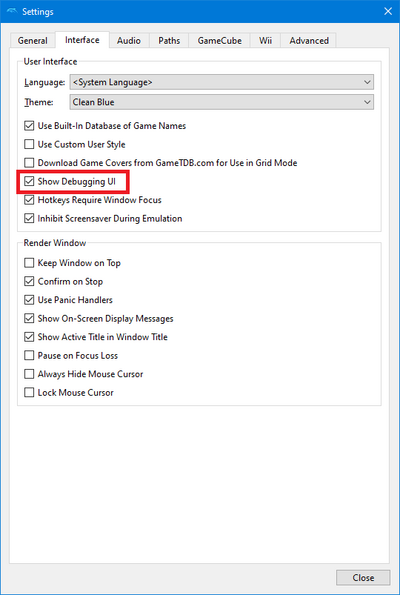
To enable the debugger, go to Config ⇒ Interface and check Show Debugging UI. A code window will pop up, and several things will be added to your toolbar. You can close the code window and ignore all the additions.
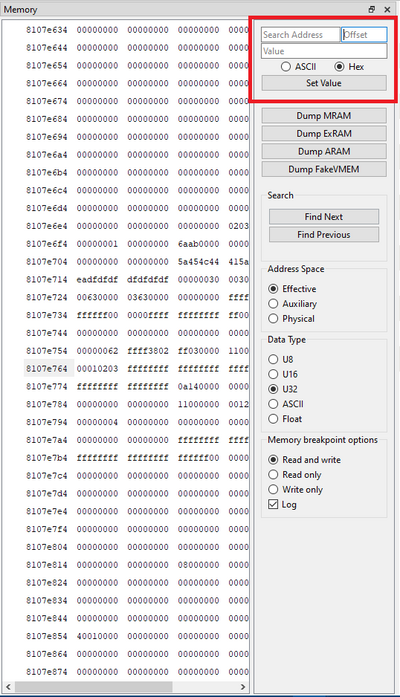
Next, in the menu bar go to View and check Memory. You'll see a window that looks like this. (Note that Dolphin only displays values in memory when emulation is paused, but values can still be set while emulation is running.) Pay attention to the highlighted section in the upper right, this is where we will be working.
Next, you must determine your offset value. Since Dolphin is running OoT within a WAD, the WAD itself adds bytes, meaning you must add an offset. Luckily, Dolphin's memory viewer already has an offset field, so you can just add it here and not worry about it. If you're using a US WAD, the offset will be F64120. If you're using a JP WAD, the offset will be E74000.
Finally, to set values in memory, you'll want to make sure Hex is selected, put the target address in the "Search Address" field, set Offset to the proper value, your desired value in the Value field, and then hit the Set Value button.
Dolphin's memory viewer is different from the others in that you cannot click to select bytes and edit them that way, so it's a bit less intuitive to use. If you want to set the 3rd slot in inventory, you'll have to add 2 to the base inventory address for the 2 bytes skipped. (If you're unsure how to add hex numbers, you can add the number of slots to the base address with a calculator like this one.)
However, you can also set multiple bytes at once. For example, if you want to give yourself just deku sticks, you can enter the base inventory address and type 00 in the Value field to give yourself deku sticks in the first slot; but if you want to give yourself deku sticks, deku nuts, bombs, and the bow, you can enter 00010203 in the Value field to give yourself them all at once. This can be used to make it easier to give yourself all ammo at once, giving all equipment, all keys, etc.
Wii Virtual Console / Virtual Wii
It is possible to transfer your save file from Wii VC/vWii (the latter is unconfirmed, but should theoretically work the same) onto an SD card, import it into Dolphin, make changes on Dolphin and then transfer the save file back onto your Wii/Wii U. To do this you'll first want to transfer your save file to your SD card thru the Wii system menu. Turn off the Wii/Wii U and inject the SD card into your computer. On your SD card navigate to private ⇒ wii ⇒ title ⇒ [Channel ID]. The Channel ID will be 4 letters, most likely NICE or NRKE. Make a backup of data.bin if you wish. Now open Dolphin and load the WAD that you were playing so it can create a save file. Right-click the WAD in the list of games and choose Open Wii Save Folder. There should be a banner.bin file in here. If not, load the WAD again until there is one (it should be there once the N64 logo appears). Stop the emulation and go to Tools ⇒ Import Wii Save.... Navigate to the data.bin on your SD card and click Open. This should properly import the Wii save file for use on Dolphin. If there is an error about NAND being corrupt, then follow the instructions to clean it. Also make sure that the banner.bin file was created. Now you can make your changes as described in the Dolphin section.
After you've made your changes, go to Tools ⇒ Export All Wii Saves and select a folder. You can just create a temporary folder on your Desktop. In this folder navigate to private ⇒ wii ⇒ title ⇒ [Channel ID] and you should see a data.bin again. Copy this to your SD card in the same location and overwrite the existing file. Safely eject the SD card from your computer, insert it into the Wii/Wii U and then copy/move your save file from your SD card back onto your Wii/Wii U. Now when you load your seed it should have the changes you made on Dolphin.
Finding the Correct Address and Value
In everyday life we use a "base 10 numeral system", which means that we use 10 different symbols for denoting numbers: "0-9". When we add one more to 9, we loop back to 0 but prefix it with a 1 to indicate that we've looped back once and we get the number "10". The hex editor/debugger uses a "base 16 numeral system" instead, which means it uses 16 different symbols for denoting numbers: "0-9" (for the numbers 0 to 9) and "A-F" (for the numbers 10-15). "Decimal numbers" are what we call the symbols of the first system and "hex numbers" are what we call symbols of the second system. To properly use the hex editor/debugger you will need to count in hex numbers. Fortunately, most calculators and many tools online can convert numbers between both numeral systems for you.
(Progressive) Items
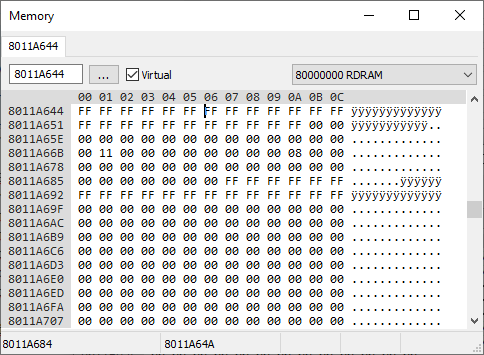
The locations of your items on the item select screen (i.e. items you can put on C buttons) start at address 8011A644 and last for 24 bytes (i.e. 24 double digit hex numbers) as seen in the image below.
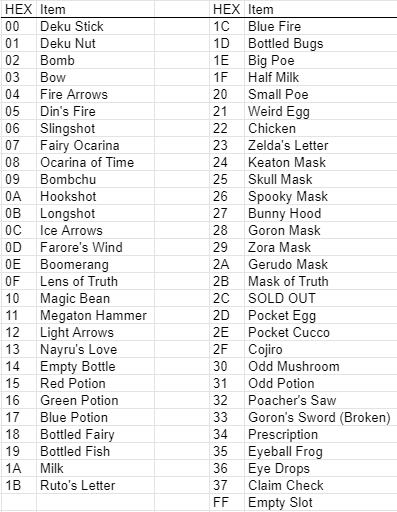
The value of the first byte determines what item is in the first slot, the value of the second byte determines what item is in the second slot, etc. The ordering for the slots follows the "logical" western reading order, that is it starts in the top left corner and goes left-to-right and top-to-bottom. Below is a table that tells you which hex numbers correspond to which items. Keep in mind that this table is only true for these 24 bytes in the RAM.
If you want to test if you understood everything so far correctly, then try to work out the inventory of the RAM in the first image of this section. The answer is: Deku Nuts in the Deku Nuts slot, Din's Fire in the Din's Fire slot, Ocarina of Time in the Ocarina slot, and Megaton Hammer in the Farore's Wind slot (whoops!).
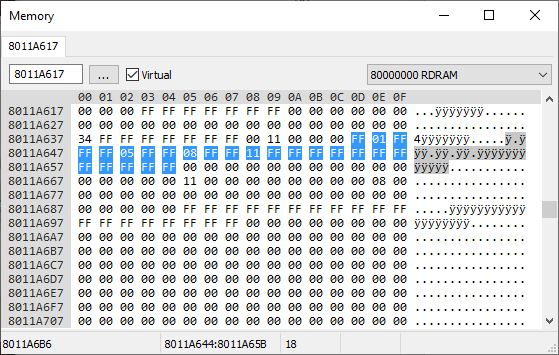
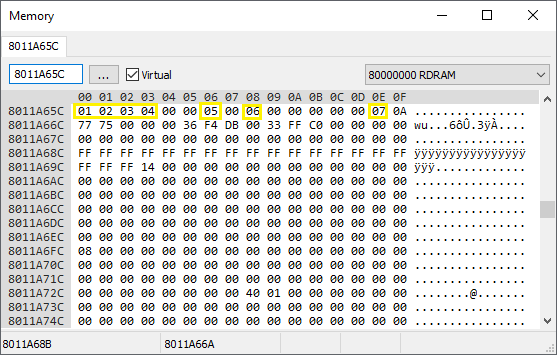
The addresses for ammo counts (e.g. Deku Sticks, Bombs, Magic Beans) start at 8011A65C and is 15 bytes long. However, only 7 of these bytes correspond to relevant ammo counts: the 1st, 2nd, 3rd, 4th, 7th, 9th and 15th (see image below). These are the counts for Deku Sticks, Deku Nuts, Bombs, Arrows, Deku Seeds, Bombchus and Magic Beans respectively. Using or obtaining additional ammo without the associated ammo holder, such as a Quiver for Arrows, will immediately drop the ammo count to 0. Note that even Deku Sticks and Deku Nuts require an "ammo holder". There are two ways to prevent this. Firstly, you can right-click the relevant bytes and choose Freeze (Bizhawk) or Lock value (Project64) (no way to do this in Dolphin). Alternatively, you can give yourself the relevant ammo holders. This information is laid out in memory in a considerably more complicated way than the other "items" mentioned in this guide and are essentially "entangled" with each other and the Progressive Strength, Wallet and Scale Upgrades. So to keep things simple we will just give you the value for having the maximum of every upgrade, and after you've resolved your softlock you can revert these bytes to their original value (make sure to write them down beforehand). Go to address 8011A670 and change the first 4 bytes into 00 36 F4 DB.
To give yourself Magic, set the byte at 8011A60A to 01, and the byte at 8011A603 to 30.
Swords/Shields/Tunics/Boots
The address for modifying Tunics and Boots is 8011A66C, and the address for Swords and Shields is 8011A66D. They are both a single byte long. The first digit of each byte controls the Boots and Shields, and the second digit controls the Tunics and Swords. Changing any of these digits to a 7 will give you all Swords/Shields/Tunics/Boots. If you don't want to have them all but only 1 or 2, then try different numbers in the range 1-7 until you get the layout you desire. Keep in mind that if you want the Biggoron Sword instead of the Giant's Knife, you'll have to change the byte at 8011A60E from 00 to 01
If you want to play around with the famous "F boots" (= anti-gravity boots), then change the byte at 8011A640 into F1.
Dungeon Rewards, Songs and Gerudo Card
The address for modifying the Spiritual Stones, Song of Time, Song of Storms and Gerudo Card (and some irrelevant things) is 8011A675, the address for Bolero of Fire, Minuet of Forest and the Medallions is 8011A677, and the address for the other songs is 8011A676. They are all a single byte long. Changing these bytes to FF will give you all of the items and songs. If you don't want to have them all but only a certain combination of them, then manually try different hex numbers. A systematic approach to finding the right number would be to increment the current hex number by 1 until you find the right one.
Keys
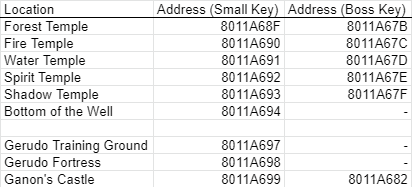
Below is a table that gives the addresses for the Small Keys and Boss Keys of all the relevant locations. They are all 1 byte long. For the Small Keys you can just insert the number of keys you want. For the Boss Keys you'll want to use one of the following numbers depending on if you also want the Map and/or Compass: 01, 03, 05 or 07.

