→Manual Setup: mention that manual method is not recommended |
m →Windows 7: make powershell permissions its own section |
||
| Line 36: | Line 36: | ||
First, go to the [https://docs.microsoft.com/en-us/powershell/scripting/install/installing-windows-powershell?view=powershell-6#upgrading-existing-windows-powershell|Microsoft Installing Powershell page] and navigate to the download page for the the latest Windows 7 SP1 Powershell version. At the time of writing it is WMF 5.1. The file on the download page you want to download is named similar to <code>Win7AndW2K8R2-KB3191566-x64.zip</code>. Run the <code>.msu</code> file inside of the zip file and it should update Powershell. | First, go to the [https://docs.microsoft.com/en-us/powershell/scripting/install/installing-windows-powershell?view=powershell-6#upgrading-existing-windows-powershell|Microsoft Installing Powershell page] and navigate to the download page for the the latest Windows 7 SP1 Powershell version. At the time of writing it is WMF 5.1. The file on the download page you want to download is named similar to <code>Win7AndW2K8R2-KB3191566-x64.zip</code>. Run the <code>.msu</code> file inside of the zip file and it should update Powershell. | ||
=== Powershell Permissions === | |||
Next you need to enable executing Powershell scripts. Open Powershell from the Start Menu by right clicking it and selecting "Run as Admin". Click the "Yes" button to allow Powershell to run as Administrator. Type <code>Set-ExecutionPolicy Unrestricted</code> and press <code>Enter</code> once, type <code>Y</code> then press <code>Enter</code> again. The Powershell script should now run. | Next you need to enable executing Powershell scripts. Open Powershell from the Start Menu by right clicking it and selecting "Run as Admin". Click the "Yes" button to allow Powershell to run as Administrator. Type <code>Set-ExecutionPolicy Unrestricted</code> and press <code>Enter</code> once, type <code>Y</code> then press <code>Enter</code> again. The Powershell script should now run. | ||
Revision as of 02:38, 31 December 2019
This guide is intended for use with the latest release Randomizer version. Dev builds require slightly altered instructions.
by Raikaru13
Generating the ROMs
Start off by going to the Webpatcher and set up the settings you want for the seed. On the `Rom Options` tab change the `World Count` to however many people will be playing. Once you're done, generate the seed.
Share this Page with all players participating. Now, discuss among yourselves who will be which player number. For example, the host would be player 1, and the others would be players 2 onwards.
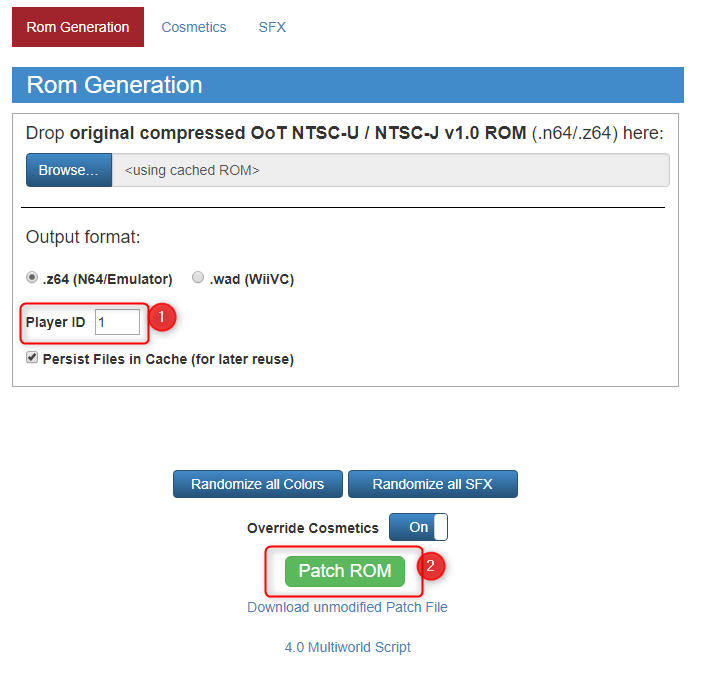
Now, everyone can open the page, select their rom/wad, change the `Player ID` section to whatever player number you are, set up your cosmetics, then patch the ROM.
Each player should have their own Randomizer ROM, with the formula `OoT_SeedID_SettingsHash_W0P0` with the W0 and P0 being world count and player ID respectively.
Multiworld is playable only on Bizhawk. This guide will help you through the custom install needed to set up Bizhawk to run Multiworld.
Download the Custom Bizhawk Installer
The very first thing that you must do is download the Multiworld script from TestRunner's GitHub page. When you download this, extract its contents to its own folder - it will be creating a new Bizhawk install for you to use, so you must keep it separate. Note: Whenever there is an update to the Multiworld script, everybody playing must update to the latest version.
Running the Custom Bizhawk Installer
Once you have the contents extracted to its own folder, locate the bizhawk-co-op.ps1 file. Right Click and select Run with PowerShell.
If Powershell prompts you for permissions, say yes to all. From here, the Powershell is getting you 99% of the way done: it will create a new Bizhawk 2.3 install and place everything for you. Once Powershell is done, open up the Bizhawk 2.3 folder it created and launch EmuHawk.exe. Note: It is recommended you delete everything outside of the Bizhawk 2.3 folder that was created. These files are no longer needed and only add confusion.
Windows 7
If you are running Windows 7 you will need to enable remote Powershell script execution, and make sure Powershell is updated.
First, go to the Installing Powershell page and navigate to the download page for the the latest Windows 7 SP1 Powershell version. At the time of writing it is WMF 5.1. The file on the download page you want to download is named similar to Win7AndW2K8R2-KB3191566-x64.zip. Run the .msu file inside of the zip file and it should update Powershell.
Powershell Permissions
Next you need to enable executing Powershell scripts. Open Powershell from the Start Menu by right clicking it and selecting "Run as Admin". Click the "Yes" button to allow Powershell to run as Administrator. Type Set-ExecutionPolicy Unrestricted and press Enter once, type Y then press Enter again. The Powershell script should now run.
Anti-Virus
Another issue that can occur while running the Powershell script is your anti-virus deleting the files it downloads. The BizHawk Prerequisites often gets marked as suspicious due to it being an installer that runs more installers. We can't give a detailed guide on how to exclude a folder in every anti-virus software, but search Google with a query like Exclude Folder <your_anti-virus_name> and you should find a guide on their official site explaining how to do so. Exclude the folder that has the Powershell script in it and now you should be able to run it without the downloaded files getting deleted.
Configuring Bizhawk for Multiworld
Bizhawk Settings
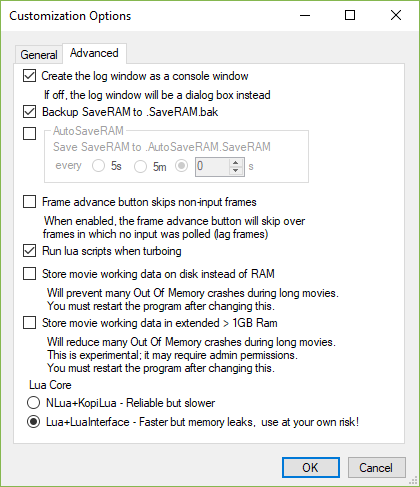
There are a few things you need to do once you've got the emulator running. The very first thing is go to Config -> Customize and navigate to the Advanced tab. At the bottom, there is an option for Lua Core; select Lua+LuaInterface and hit OK. While on the Advanced tab, you should also check the box for AutoSaveRAM and set it to 30s! (Apologies that this isn't included in the image.) This will allow Bizhawk to write your in-game save to your drive. (This is NOT a form of save state - it simply periodically creates/updates a file on your hard drive with your in-game save data, and is wonderful for mitigating the effects of crashes. Remember to save often!)
In the General tab of the Customize menu, check the box to enable Accept background input – this will allow Bizhawk to keep accepting controller inputs when you tab over to your tracker or notes. Clear your hotkeys by going to Config -> Hotkeys, and at the bottom click Misc and Clear All.
Controller Settings
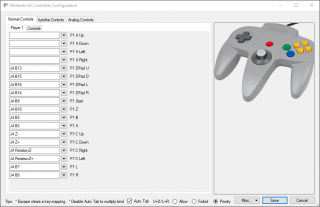
The next step is to set your controller up. Your controller configuration will vary based on what controller you are using; for Bizhawk to enable the Controller menu, you must have a ROM loaded. For a smooth controller experience, you must unbind the first 4 binds in Config -> Controller such that it looks like this:
You'll then have to bind your analog stick in the Analog tab of your controller config and adjust your sensitivity and deadzones to your preference. Additional info on controller setup can be found in Step 6 of the Bizhawk Guide.
Video Settings
You can fix how your game looks by going to Config -> Cores -> N64 Video Plugin Settings. In here, change your resolution so that it runs smooth. Multiworld will drop your performance, so keep that in mind. The recommended video plugin is GLideN64. (This is not the same plugin as Glide64!)
Opening the Lua Console
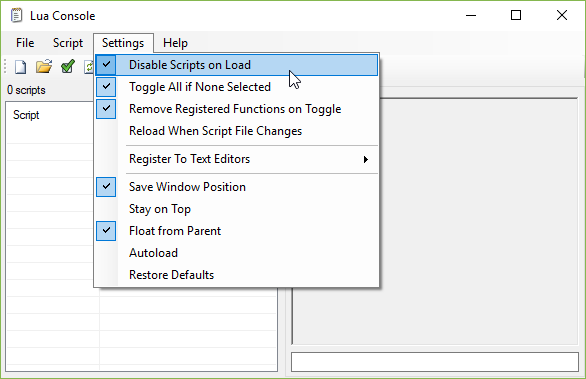
Once you have your emulator set up to run how you are comfortable with, its time to move to the Lua console. Go to Tools -> Lua Console, and a separate window will open up. This window must remain open at all times during a Multiworld. In the Lua Console, go to Settings and checkmark the Disable Scripts on loads.
This is the last of the settings changes you have to do. If you want Bizhawk to retain these settings changes for the next time, go to Config -> Save Config. Once you have these steps done, you MUST close your emulator and reopen it for this change to take effect. Close out of Bizhawk, and then reopen it and the Lua Console. Sometimes this will not be enough and you will still get an error trying to load the Lua file. In that case reboot your entire computer.
If for some reason you do not have your Multiworld ROM open, you must do so now.
From here in the Lua Console, Open Script and locate the bizhawk co-op.lua file in the Bizhawk 2.3 folder. Once you have that done, a red square will appear in the console; double click it and a new window will open up.
This window must also stay open at all times.
Rooms
The Lua Console Script is where you set up a room and join rooms.
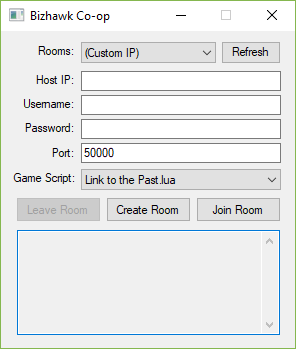
If you are the Host: You must port forward. How you do this varies on what brand your router is. Instructions on how to do this can be found by Googling your brand/model of router. Once that is done, in the Bizhawk Co-op window the Host must set their name, password, and the port that was forwarded, along with setting the game script to Ocarina of Time. Hit Create Room and tell the people joining the Room Name, password, and port. (It is not recommended to use your own personal password here, as it is shared with the group. Use something that will prevent random people from joining your room, but not something that will compromise your own security.)
If you are Joining and the Host has set up the room: hit Refresh in the Bizhawk Co-op window and select the Host's Room from the dropdown bar. When you input your username, keep in mind the game will use this to display who got what item for everyone playing. It will max out at 8 characters, even if you input more. Fill in the password and port number the Host gave you and select the Ocarina of Time Game Script and hit Join Room.
Play Some Multiworld!
Go and have fun with new or old friends! If you are part of the Ocarina of Time Randomizer Discord, you can assign the Multiworld role to yourself by going to the #chat-bot channel and typing !role Multiworld - this will allow you to receive pings in the server where there are announcements from the Devs or folks are looking for players. You can also visit #multiworld-planning to look for additional players. It is highly recommended that you use one of the Trackers so that you don't accidentally leave those new friends out to dry if you miss a check.. Map Trackers such as 2deep4real's Web Tracker or Hamsda's Map and Item Tracker package for EmoTracker are highly recommended.
Special Circumstances
Manual Setup
It is NOT recommended to do this. The PowerShell is a much more consistent installation and update method.
This will be helpful to those who can not run PowerShell for some reason. First download, extract, and run the Bizhawk prerequisite found here. (Yes, this step is absolutely required.) Next, download the following zip file and extract it to its own folder. This will contain an archived version of the co-op build from 12/27/18. https://www.dropbox.com/s/t9ia81ao993rhtv/BizHawk-2.3.zip?dl=0 This archival copy will need to be updated a bit; you will need to download the latest build of co-op and replace the ram controller files in /bizhawk-co-op/ramcontroller/. The latest version of this file can be found at https://github.com/TestRunnerSRL/bizhawk-co-op/tree/master/bizhawk-co-op/ramcontroller.
Can't Port-Forward
If nobody in your multiworld group can port-forward for whatever reason, and you cannot get someone who can to join, then there is a program you can use: Hamachi. Let me preface this by saying that Hamachi basically 'tricks' your computers to believe that you are all connected via LAN.
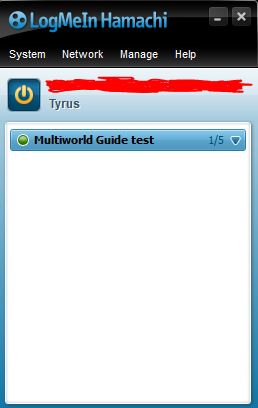
To start, download Hamchi [here] and install it. Create an account, and go to System > Preferences > Settings to make sure that 'Encryption' is enabled. Then, click on the power button to go online.
If you're hosting, then click Network > Create a new network. Give it a unique name and password, making sure that nobody other than the people you're playing with find out this information. After this, you'll see it pop onscreen:
To join an existing network, click Network > Join an existing network. Type in your friend's network ID and the network's password.
Once you're all connected in the network, you can start the multiworld.
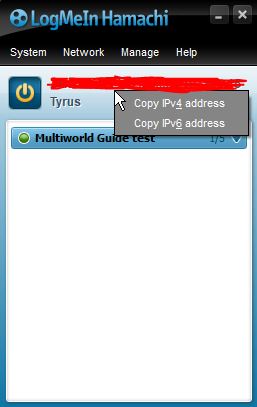
Right click on the address above your nickname, and click 'Copy IPv4 address':
Then, start up the Bizhawk co-op lua script. Set 'Rooms' to '(Custom IP)' and paste the IPv4 into the 'Host IP' bar. Set your Username and Password as usual, and the game script to Ocarina of Time.
Now you should be ready to start. As usual, if you have any more problems, seek advice within the OoTR Discord Server. Oh, and, be careful with who you give permission to join your network to.
Hamachi Request Timed Out
Follow these steps to ensure Hamachi is allowed through your firewall. Both the Host and the clients connecting to the host should do this.
Playing over LAN
If you're playing over a LAN network, then all you need to do is set the 'room' to (Custom IP), type the LAN's Ipv4 into the 'host IP' field, and give yourself a username. Leave the password field blank.

