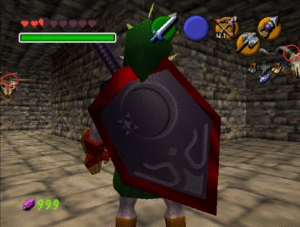
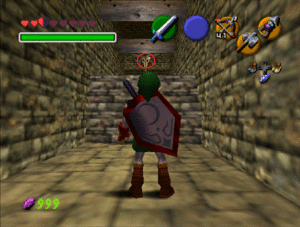
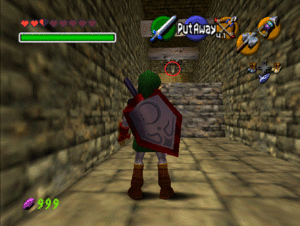
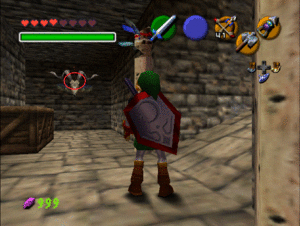
Added a lil blurb at the top explaining what a Wonderitem is |
Added pictures, table still needs tidied up with formatting |
||
| Line 8: | Line 8: | ||
|- | |- | ||
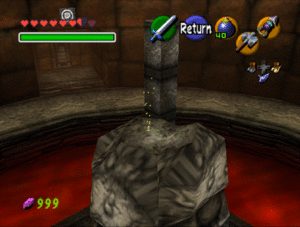
|Contact (Yellow) | |Contact (Yellow) | ||
| | |[[File:Yellow.gif|alt=Yellow wonderitem sparkles|thumb]] | ||
| style="text-align:center" |Activates upon Link touching it | | style="text-align:center" |Activates upon Link touching it | ||
|- | |- | ||
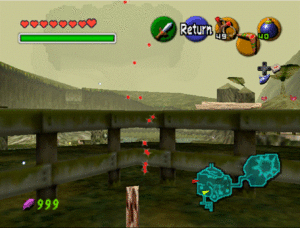
|Target (Red) | |Target (Red) | ||
| | |[[File:Red.gif|alt=Red wonderitem sparkles|thumb]] | ||
| style="text-align:center" |Drops an item when shot with a particular item, either sword, hammer, slingshot, bow or hookshot | | style="text-align:center" |Drops an item when shot with a particular item, either sword, hammer, slingshot, bow or hookshot | ||
|- | |- | ||
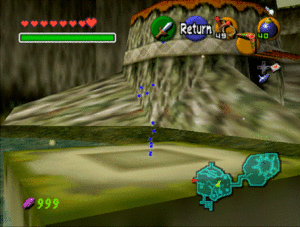
|Multiple Contact (Deep Blue) | |Multiple Contact (Deep Blue) | ||
| | |[[File:Blue.gif|alt=Blue wonderitem sparkles|thumb]] | ||
| style="text-align:center" |Activates upon Link touching all linked points | | style="text-align:center" |Activates upon Link touching all linked points | ||
|- | |- | ||
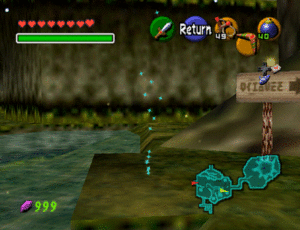
|Ordered Contact (Cyan Blue) | |Ordered Contact (Cyan Blue) | ||
| | |[[File:Cyan.gif|alt=Cyan wonderitem sparkles|thumb]] | ||
| style="text-align:center" |Activates upon Link touching all linked points in a specific order | | style="text-align:center" |Activates upon Link touching all linked points in a specific order | ||
|- | |- | ||
| Line 33: | Line 33: | ||
|- | |- | ||
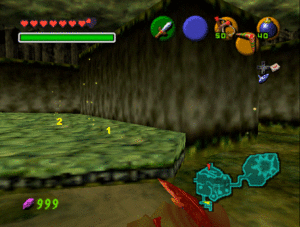
|Grass Stepping Stones | |Grass Stepping Stones | ||
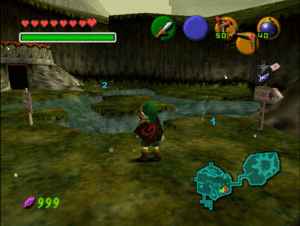
| | |[[File:Grass-stepping-stones.gif|alt=stepping stones in Kokiri Forest|thumb]] | ||
| style="text-align:center" |Child | | style="text-align:center" |Child | ||
| style="text-align:center" |The points must be touched in the order noted, Twins' House side and then Shop side | | style="text-align:center" |The points must be touched in the order noted, Twins' House side and then Shop side | ||
|- | |- | ||
|Stone Stepping Stones | |Stone Stepping Stones | ||
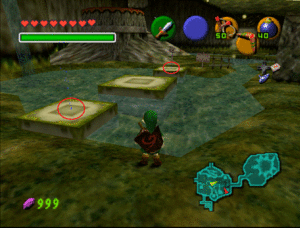
| | |[[File:Stone-stepping-stones.gif|alt=Stone stepping stones in Kokiri Forest|thumb]] | ||
| style="text-align:center" |Child | | style="text-align:center" |Child | ||
| style="text-align:center" |Both points must be touched in any order | | style="text-align:center" |Both points must be touched in any order | ||
|- | |- | ||
|Training Signpost | |Training Signpost | ||
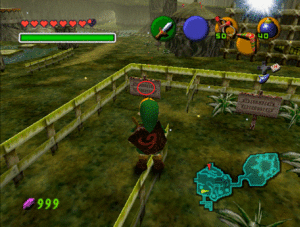
| | |[[File:Kokiri-sign-wonderitem.gif|alt=Signpost in Kokiri Forest|thumb]] | ||
| style="text-align:center" |Child | | style="text-align:center" |Child | ||
| style="text-align:center" |Must be slashed with a sword or stick | | style="text-align:center" |Must be slashed with a sword or stick | ||
|- | |- | ||
|Backflip Training x3 | |Backflip Training x3 | ||
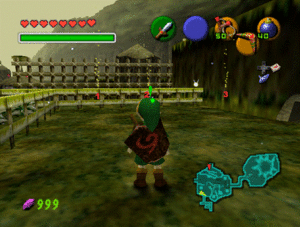
| | |[[File:Backflip-training.gif|alt=Backflip wonderitems in Kokiri Forest|thumb]] | ||
| style="text-align:center" |Child | | style="text-align:center" |Child | ||
| style="text-align:center" |Must be jumped or backflipped into | | style="text-align:center" |Must be jumped or backflipped into | ||
|- | |- | ||
|Maze Grass x2 | |Maze Grass x2 | ||
| | |[[File:Kokiri-maze-wonderitems.gif|alt=Maze wonderitems in Kokiri Forest|thumb]] | ||
| style="text-align:center" |Child | | style="text-align:center" |Child | ||
| style="text-align:center" | | | style="text-align:center" | | ||
|- | |- | ||
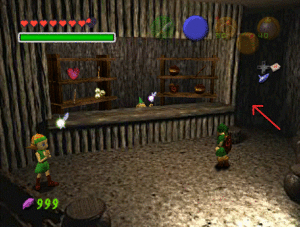
|Kokiri Shop | |Kokiri Shop | ||
| | |[[File:Kokiri-shop-wonderitem.gif|alt=Shop wonderitem in kokiri forest|thumb]] | ||
| style="text-align:center" |Child | | style="text-align:center" |Child | ||
|- | |- | ||
| Line 72: | Line 71: | ||
|- | |- | ||
|Ocarina Game Grass x3 | |Ocarina Game Grass x3 | ||
| | |[[File:Woods-ocarina-game.gif|alt=Wonderitems at the ocarina minigame in Lost Woods|thumb]] | ||
| style="text-align:center" |Child | | style="text-align:center" |Child | ||
| style="text-align:center" | | | style="text-align:center" | | ||
| Line 86: | Line 85: | ||
|- | |- | ||
|Entrance Grass x1 | |Entrance Grass x1 | ||
| | |[[File:Sfm-entrance-wonderitem.gif|alt=Wonderitem at the entrance of SFM|thumb]] | ||
| style="text-align:center" |Child | | style="text-align:center" |Child | ||
| style="text-align:center" | | | style="text-align:center" | | ||
| Line 92: | Line 91: | ||
|- | |- | ||
|Maze Alcoves x5 | |Maze Alcoves x5 | ||
| | |[[File:Sfm-maze.jpg|alt=Map of SFM showing the wonderitem locations|thumb]] | ||
| style="text-align:center" |Child | | style="text-align:center" |Child | ||
| style="text-align:center" | | | style="text-align:center" | | ||
| Line 106: | Line 105: | ||
|- | |- | ||
|Daytime Balcony x5 | |Daytime Balcony x5 | ||
| | |[[File:Market-day-wonders.gif|alt=Wonderitems in daytime Market|thumb]] | ||
| style="text-align:center" |Child | | style="text-align:center" |Child | ||
| style="text-align:center" |Only available during the day | | style="text-align:center" |Only available during the day | ||
|- | |- | ||
|Nighttime Balcony x2 | |Nighttime Balcony x2 | ||
| | |[[File:Market-night-wonders.gif|alt=Wonderitems in nighttime Market|thumb]] | ||
| style="text-align:center" |Child | | style="text-align:center" |Child | ||
| style="text-align:center" |Only available at night | | style="text-align:center" |Only available at night | ||
| Line 126: | Line 124: | ||
|- | |- | ||
|Drawbridge Torches 2 | |Drawbridge Torches 2 | ||
| | |[[File:Drawbridge-torches.gif|alt=Wonderitems at the castle drawbridge torches|thumb]] | ||
| style="text-align:center" |Child | | style="text-align:center" |Child | ||
| style="text-align:center" |Must be shot with a Slingshot | | style="text-align:center" |Must be shot with a Slingshot | ||
| Line 132: | Line 130: | ||
|- | |- | ||
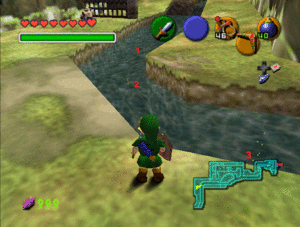
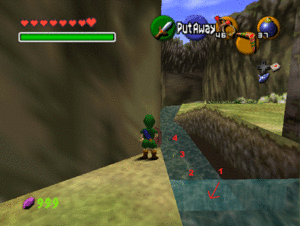
|Castle Moat x 10 | |Castle Moat x 10 | ||
| | |[[File:Castle-moat-1-Wonderitems.gif|alt=First half of the wonderitems in the castle moat|thumb]][[File:Castle-moat-2-wonderitems.gif|alt=Second half of the wonderitems in the castle moat|thumb]] | ||
| style="text-align:center" |Child | | style="text-align:center" |Child | ||
| style="text-align:center" | | | style="text-align:center" | | ||
|- | |- | ||
|Courtyard Mario Painting | |Courtyard Mario Painting | ||
| | |[[File:Castle-courtyard-wonderitem.gif|alt=it's a me, wonderitem!|thumb]] | ||
| style="text-align:center" |Child | | style="text-align:center" |Child | ||
| style="text-align:center" |Must be shot with a Slingshot | | style="text-align:center" |Must be shot with a Slingshot | ||
| Line 152: | Line 149: | ||
|- | |- | ||
|Drawbridge x3 | |Drawbridge x3 | ||
| | |[[File:Field-drawbridge-wonderitems.gif|alt=Wonderitems on the drawbridge in Hyrule Field|thumb]] | ||
| style="text-align:center" |Child | | style="text-align:center" |Child | ||
| style="text-align:center" |Notes | | style="text-align:center" |Notes | ||
|- | |- | ||
| | |||
|} | |} | ||
| Line 166: | Line 164: | ||
|- | |- | ||
|Building Under Construction | |Building Under Construction | ||
| | |[[File:Kak-construction.gif|alt=Wonderitem on the Kakariko construction site|thumb]] | ||
| style="text-align:center" |Child | | style="text-align:center" |Child | ||
| style="text-align:center" |The carpenter can be avoided by ledge-grabbing | | style="text-align:center" |The carpenter can be avoided by ledge-grabbing | ||
|- | |- | ||
| | |||
|- | |- | ||
|Impa's House | |Impa's House | ||
| | |[[File:Kak-impas-house.gif|alt=Wonder item in the front of Impa's house|thumb]] | ||
| style="text-align:center" |Both | | style="text-align:center" |Both | ||
| style="text-align:center" | | | style="text-align:center" | | ||
| Line 186: | Line 185: | ||
|- | |- | ||
|Dampe Race x15 | |Dampe Race x15 | ||
| | | | ||
| style="text-align:center" |Adult | | style="text-align:center" |Adult | ||
| style="text-align:center" |Notes | | style="text-align:center" |Notes | ||
| Line 199: | Line 198: | ||
! style="text-align:center" |Notes | ! style="text-align:center" |Notes | ||
|- | |- | ||
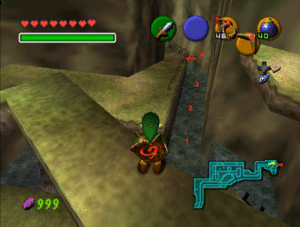
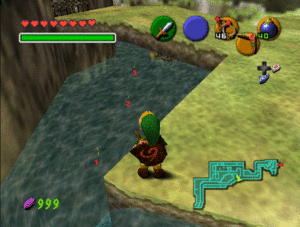
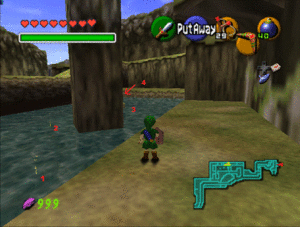
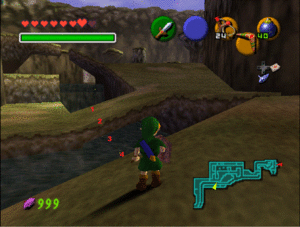
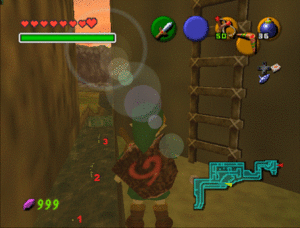
| | |Upper River x27 | ||
| | |[[File:Upper-river-1.gif|alt=Wonderitems in upper river |thumb]][[File:Upper-river-2.gif|alt=Wonderitems in upper river |thumb|[[File:Upper-river-3.gif|alt=Wonderitems in upper river |thumb]][[File:Upper-river-4.gif|alt=Wonderitems in upper river |thumb]][[File:Upper-river-5.gif|alt=Wonderitems in upper river |thumb]]]][[File:Upper-river-6.gif|alt=Wonderitems in upper river |thumb]][[File:Upper-river-7.gif|alt=Wonderitems in upper river |thumb]] | ||
| style="text-align:center" |Child | | style="text-align:center" |Child | ||
| style="text-align:center" | | | style="text-align:center" |These require either bombs or a scale to reach the upper river levels | ||
|- | |- | ||
|- | |- | ||
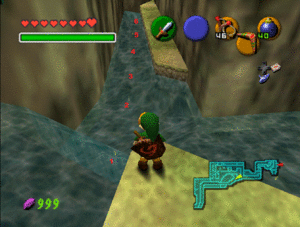
| | |Lower River x4 | ||
| | |[[File:Lower-river-wonderitems.gif|alt=Wonderitems in lower river |thumb]] | ||
| style="text-align:center" |Child | | style="text-align:center" |Child | ||
| style="text-align:center" | | | style="text-align:center" |These can be reached without opening up the upper river region | ||
|- | |- | ||
|} | |} | ||
| Line 220: | Line 219: | ||
|- | |- | ||
|Hurdles x2 | |Hurdles x2 | ||
| | |[[File:Ranch-Wonderitem-1.gif|alt=Wonderitem over the hurdles in the ranch|thumb|[[File:Ranch-wonderitem-2.gif|alt=Wonderitem over the hurdles in the ranch|thumb]]]] | ||
| style="text-align:center" |Adult | | style="text-align:center" |Adult | ||
| style="text-align:center" |Need to jump into them on Epona | | style="text-align:center" |Need to jump into them on Epona | ||
| Line 234: | Line 233: | ||
|- | |- | ||
|Upper Waterfall | |Upper Waterfall | ||
| | |[[File:Valley-upper-wonderitem.gif|alt=Wonderitem at the top of the upper waterfall in the valley|thumb]] | ||
| style="text-align:center" |Adult | | style="text-align:center" |Adult | ||
| style="text-align:center" |From the spot you pick up the item, a backflip should hit it | | style="text-align:center" |From the spot you pick up the item, a backflip should hit it | ||
| Line 240: | Line 239: | ||
|- | |- | ||
|Lower Waterfall | |Lower Waterfall | ||
| | |[[File:Valley-lower.gif|alt=Wonderitem at the top of the lower waterfall in the valley|thumb]] | ||
| style="text-align:center" |Adult | | style="text-align:center" |Adult | ||
| style="text-align:center" |Easier to dive from the ledge rather than drop onto it | | style="text-align:center" |Easier to dive from the ledge rather than drop onto it | ||
| Line 254: | Line 253: | ||
|- | |- | ||
|Entryway Sign | |Entryway Sign | ||
| | |[[File:Fortress-lower.gif|alt=Gerudo Fortress entryway sign wonderitem|thumb]] | ||
| style="text-align:center" |Adult | | style="text-align:center" |Adult | ||
| style="text-align:center" |Must be shot with a Hookshot | | style="text-align:center" |Must be shot with a Hookshot | ||
|- | |- | ||
| | |||
|- | |- | ||
|Horseback Archery Sign | |Horseback Archery Sign | ||
| | |[[File:Fortress-upper.gif|alt=Gerudo Fortress archery sign wonderitem|thumb]] | ||
| style="text-align:center" |Adult | | style="text-align:center" |Adult | ||
| style="text-align:center" |Must be shot with a Hookshot | | style="text-align:center" |Must be shot with a Hookshot | ||
| Line 274: | Line 274: | ||
|- | |- | ||
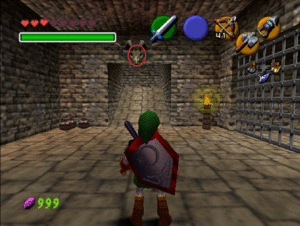
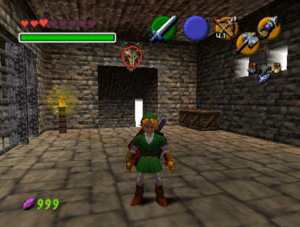
|Jail 1 Skulls x2</br>Jail 2 Skulls x2</br>Jail 3 Skulls x2 | |Jail 1 Skulls x2</br>Jail 2 Skulls x2</br>Jail 3 Skulls x2 | ||
| | |[[File:Jail-skull-entrance.gif|alt=Wonderitem in the skull at the entrance to jail cells|thumb|[[File:Jail-skull-2.gif|alt=Wonderitem in the skull at the exit to jail cells|thumb]]]] | ||
| style="text-align:center" |Adult | | style="text-align:center" |Adult | ||
| style="text-align:center" |Each jail has a skull above either exit from the cells</br></br>Must be shot with a Bow | | style="text-align:center" |Each jail has a skull above either exit from the cells</br></br>Must be shot with a Bow | ||
| Line 280: | Line 280: | ||
|- | |- | ||
|Jail 4 Skulls x2 | |Jail 4 Skulls x2 | ||
| | |[[File:Upper-jail-hallway.gif|alt=Wonderitems in the skulls in the hallway to jail cell 4|thumb]] | ||
| style="text-align:center" |Adult | | style="text-align:center" |Adult | ||
| style="text-align:center" |Must be shot with a Bow | | style="text-align:center" |Must be shot with a Bow | ||
| Line 286: | Line 286: | ||
|- | |- | ||
|Break Room Skulls x2 | |Break Room Skulls x2 | ||
| | |[[File:Breakroom-hallway-skull-1.gif|alt=Wonderitem in the skull in the hideout break room|thumb|[[File:Breakroom-hallway-skull-2.gif|alt=Wonderitem in the skull in the hideout break room|thumb]]]] | ||
| style="text-align:center" |Adult | | style="text-align:center" |Adult | ||
| style="text-align:center" |Must be shot with a Bow | | style="text-align:center" |Must be shot with a Bow | ||
|- | |- | ||
| | |||
|- | |- | ||
|Kitchen Skull | |Kitchen Skull | ||
| | |[[File:Kitchen-hallway-skull.gif|alt=Wonderitem in the skull in the hideout kitchen room|thumb]] | ||
| style="text-align:center" |Adult | | style="text-align:center" |Adult | ||
| style="text-align:center" |Must be shot with a Bow | | style="text-align:center" |Must be shot with a Bow | ||
| Line 298: | Line 299: | ||
|- | |- | ||
|In the Soup | |In the Soup | ||
| | |[[File:Good-soup.gif|alt=good soup|thumb]] | ||
| style="text-align:center" |Both | | style="text-align:center" |Both | ||
| style="text-align:center" |You will take damage in the soup without Goron Tunic/Nayru's Love. | | style="text-align:center" |You will take damage in the soup without Goron Tunic/Nayru's Love. | ||
| Line 312: | Line 313: | ||
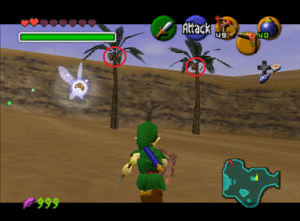
|- | |- | ||
|Great Fairy Fountain Trees | |Great Fairy Fountain Trees | ||
| | |[[File:Colossus-fairy-trees.gif|alt=Wonderitem trees near the fairy fountain in Colossus|thumb]] | ||
| style="text-align:center" |Both | | style="text-align:center" |Both | ||
| style="text-align:center" |Must be shot with a Slingshot or Bow | | style="text-align:center" |Must be shot with a Slingshot or Bow | ||
| Line 318: | Line 319: | ||
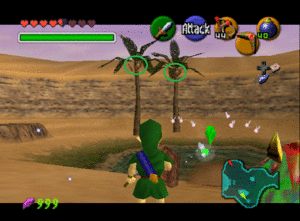
|- | |- | ||
|Oasis Trees 1 & 2 | |Oasis Trees 1 & 2 | ||
| | |[[File:Colossus-oasis-trees.gif|alt=Wonderitem trees near the oasis in Colossus|thumb]] | ||
| style="text-align:center" |Both | | style="text-align:center" |Both | ||
| style="text-align:center" |Must be shot with a Slingshot or Bow | | style="text-align:center" |Must be shot with a Slingshot or Bow | ||
| Line 324: | Line 325: | ||
|- | |- | ||
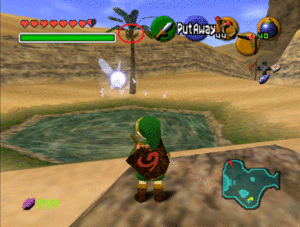
|Oasis Trees 3 | |Oasis Trees 3 | ||
| | |[[File:Colossus-wonderitem-child-tree.gif|alt=Wonderitem tree near the oasis in Colossus. Child only, as this tree has a skulltula on it as adult|thumb]] | ||
| style="text-align:center" |Child | | style="text-align:center" |Child | ||
| style="text-align:center" |Must be shot with a Slingshot | | style="text-align:center" |Must be shot with a Slingshot | ||
| Line 338: | Line 339: | ||
|- | |- | ||
|Beamos Room Door | |Beamos Room Door | ||
| | |[[File:Gtg-beamos-wonderitem.gif|alt=Wonderitem above the door of the beamos/dinolfos room in GTG|thumb]] | ||
| style="text-align:center" |Age | | style="text-align:center" |Age | ||
| style="text-align:center" |Must be shot with a Bow | | style="text-align:center" |Must be shot with a Bow | ||
|- | |- | ||
| | |||
|- | |- | ||
|Torch Slug Room Door | |Torch Slug Room Door | ||
| | |[[File:Gtg-slugs-wonderitem.gif|alt=Wonderitem above the door of the slugs room in GTG|thumb]] | ||
| style="text-align:center" |Age | | style="text-align:center" |Age | ||
| style="text-align:center" |Must be shot with a Bow | | style="text-align:center" |Must be shot with a Bow | ||
| Line 350: | Line 352: | ||
|- | |- | ||
|Top of Eye Statue | |Top of Eye Statue | ||
| | |[[File:Gtg-eye-statue-wonderitem.gif|alt=Wonderitem above the eye statue in GTG|thumb]] | ||
| style="text-align:center" |Age | | style="text-align:center" |Age | ||
| style="text-align:center" |Must have Hover Boots to reach | | style="text-align:center" |Must have Hover Boots to reach | ||
| Line 364: | Line 366: | ||
|- | |- | ||
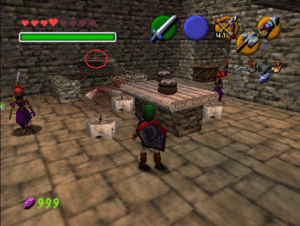
|Triple Pot Room Wall | |Triple Pot Room Wall | ||
| | |[[File:Wonderitem-shadow.gif|alt=Wonderitem above the door of the triple pot room of Shadow temple|thumb]] | ||
| style="text-align:center" |Age | | style="text-align:center" |Age | ||
| style="text-align:center" |Must be shot with a Bow | | style="text-align:center" |Must be shot with a Bow | ||
|- | |- | ||
|} | |} | ||
Revision as of 02:06, 15 January 2024
Wonderitems are invisible triggers in the world, either points Link touches (the invisible rupees when swimming down Zora's River) or shoots with an item (the rupees from shooting the Gerudo Fortress signs with a Hookshot). When these are shuffled, they will be highlighted with a sparkling effect. Each type of wonderitem trigger has a different colour, explained below.
Types of Wonderitem
Kokiri Forest: 9 Items
Lost Woods: 3 Items
| Location | Image | Age | Notes |
|---|---|---|---|
| Ocarina Game Grass x3 | 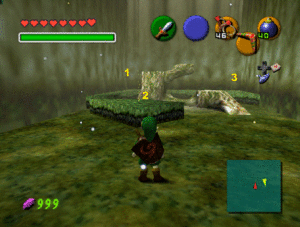 |
Child |
Sacred Forest Meadow: 6 Items
| Location | Image | Age | Notes |
|---|---|---|---|
| Entrance Grass x1 | 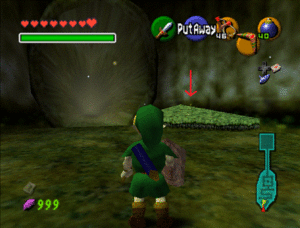 |
Child | |
| Maze Alcoves x5 | 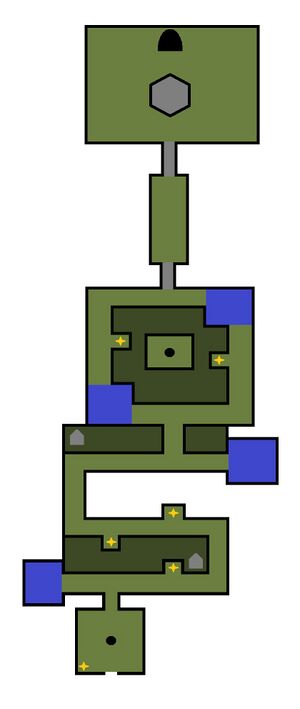 |
Child |
Market: 7 Items
| Location | Image | Age | Notes |
|---|---|---|---|
| Daytime Balcony x5 | 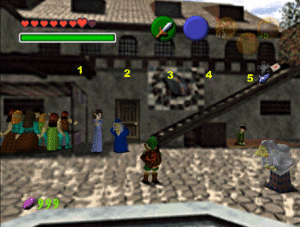 |
Child | Only available during the day |
| Nighttime Balcony x2 | 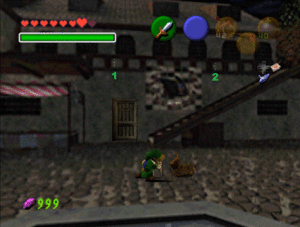 |
Child | Only available at night |
Hyrule Castle: 13 Items
| Location | Image | Age | Notes |
|---|---|---|---|
| Drawbridge Torches 2 | 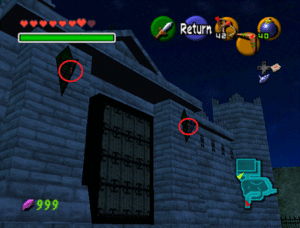 |
Child | Must be shot with a Slingshot |
| Castle Moat x 10 | 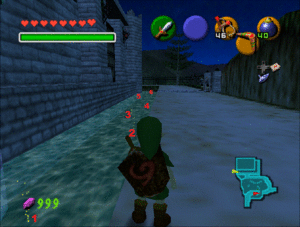 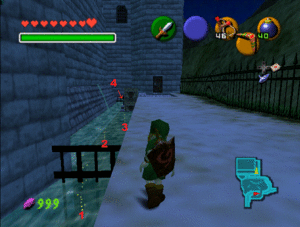 |
Child | |
| Courtyard Mario Painting | 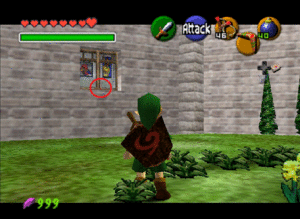 |
Child | Must be shot with a Slingshot |
Hyrule Field: 3 Items
| Location | Image | Age | Notes |
|---|---|---|---|
| Drawbridge x3 | 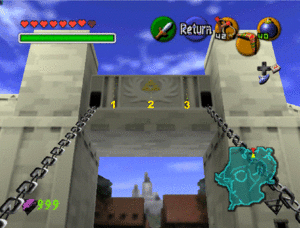 |
Child | Notes |
Kakariko: 2 Items
| Location | Image | Age | Notes |
|---|---|---|---|
| Building Under Construction | 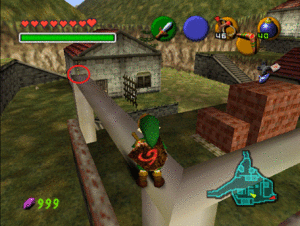 |
Child | The carpenter can be avoided by ledge-grabbing |
| Impa's House | 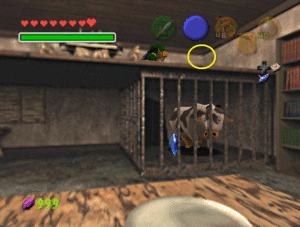 |
Both |
Graveyard: 15 Items
| Location | Image | Age | Notes |
|---|---|---|---|
| Dampe Race x15 | Adult | Notes |
Zora's River: 31 Items
Lon Lon Ranch: 2 Items
| Location | Image | Age | Notes |
|---|---|---|---|
| Hurdles x2 | 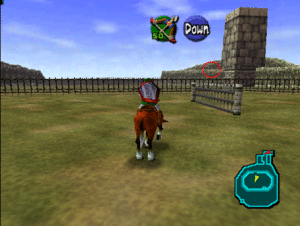 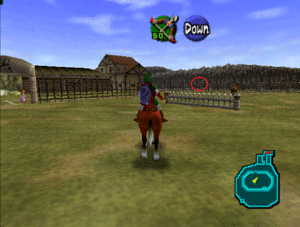 |
Adult | Need to jump into them on Epona |
Gerudo Valley: 2 Items
| Location | Image | Age | Notes |
|---|---|---|---|
| Upper Waterfall | 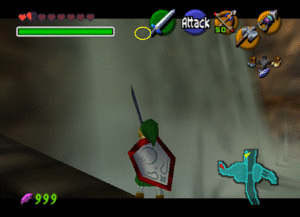 |
Adult | From the spot you pick up the item, a backflip should hit it |
| Lower Waterfall | 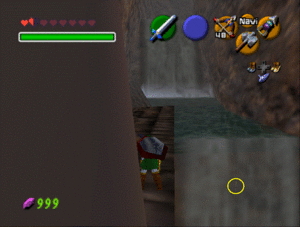 |
Adult | Easier to dive from the ledge rather than drop onto it |
Gerudo Fortress: 2 Items
| Location | Image | Age | Notes |
|---|---|---|---|
| Entryway Sign | 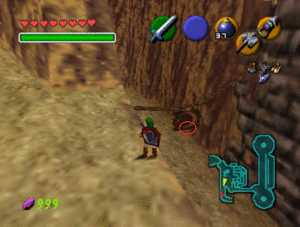 |
Adult | Must be shot with a Hookshot |
| Horseback Archery Sign | 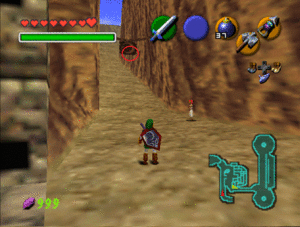 |
Adult | Must be shot with a Hookshot |
Thieves' Hideout: 12 Items
Desert Colossus: 5 Items
Gerudo Training Grounds: 3 Items
| Location | Image | Age | Notes |
|---|---|---|---|
| Beamos Room Door | 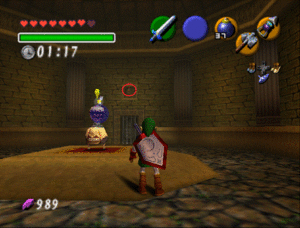 |
Age | Must be shot with a Bow |
| Torch Slug Room Door | 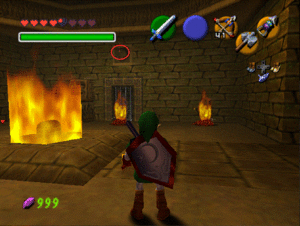 |
Age | Must be shot with a Bow |
| Top of Eye Statue | 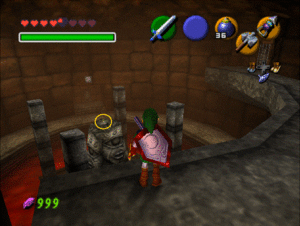 |
Age | Must have Hover Boots to reach |
Shadow Temple: 1 Item
| Location | Image | Age | Notes |
|---|---|---|---|
| Triple Pot Room Wall | 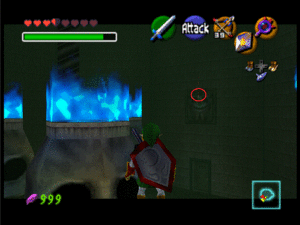 |
Age | Must be shot with a Bow |

