add intro paragraph, move downloading to above the ToC |
|||
| Line 1: | Line 1: | ||
BizHawk is a frontend for small number of emulators and is targeted at Tool-Assisted Speedrunners. The advantage of this is that it means the emulators you use on it are targeted towards accuracy so you are unlikely to run into too many bugs that aren't also found when running the games on hardware. A small disadvantage to this is that these emulators also have various debugging tools enabled, which generally means they run slightly slower than emulators without these features enabled. But this also allows further manipulation of the game via Lua scirpts which is how [[Multiworld]] functions. This also means that as of right now, BizHawk is the only emulator that can be used for playing Multiworld. | |||
First, you must download BizHawk and the files it requires to have installed to even run. | First, you must download BizHawk and the files it requires to have installed to even run. | ||
* [https://github.com/TASVideos/BizHawk-Prereqs/releases/latest Prerequisite Files Installer] | * [https://github.com/TASVideos/BizHawk-Prereqs/releases/latest Prerequisite Files Installer] | ||
* [https://github.com/TASVideos/BizHawk/releases/ BizHawk Emulator] | * [https://github.com/TASVideos/BizHawk/releases/ BizHawk Emulator] | ||
== Installing == | |||
<span style="display:block;margin:20px;">[[File:Bizhawk 01.png|RTENOTITLE]]</span> | <span style="display:block;margin:20px;">[[File:Bizhawk 01.png|RTENOTITLE]]</span> | ||
| Line 17: | Line 14: | ||
Inside there should be a file called <code>bizhawk_prereqs.exe</code>. Double-click this file and click next a couple of times, then wait for all of the files to install. Once the installer has completed you can continue. | Inside there should be a file called <code>bizhawk_prereqs.exe</code>. Double-click this file and click next a couple of times, then wait for all of the files to install. Once the installer has completed you can continue. | ||
== Emulator Setup == | |||
You can now start up BizHawk. Open the folder ''BizHawk-X.X.X'' where <code>X.X.X</code> is the BizHawk version you downloaded, such as <code>2.3.0</code>. This version can be different than the Prerequisites version. Inside this folder is a file called <code>EmuHawk.exe</code>. Open this file. | You can now start up BizHawk. Open the folder ''BizHawk-X.X.X'' where <code>X.X.X</code> is the BizHawk version you downloaded, such as <code>2.3.0</code>. This version can be different than the Prerequisites version. Inside this folder is a file called <code>EmuHawk.exe</code>. Open this file. | ||
| Line 26: | Line 23: | ||
Now that you have loaded a ROM a new menu entry ''N64'' will show up in the menu bar. Ensure <code>N64 > Use Expansion Slot</code> has a check-mark beside it indicating it is enabled. If it does not click on it to enable it. Once you have enabled the setting you have to reboot the core for it to take effect. Navigate to <code>Emulation > Reboot Core</code> to do so. | Now that you have loaded a ROM a new menu entry ''N64'' will show up in the menu bar. Ensure <code>N64 > Use Expansion Slot</code> has a check-mark beside it indicating it is enabled. If it does not click on it to enable it. Once you have enabled the setting you have to reboot the core for it to take effect. Navigate to <code>Emulation > Reboot Core</code> to do so. | ||
== Controls Setup == | |||
With the ROM still running, go to <code>Config > Controllers...</code> and set up your controls by clicking on the textboxes and pressing the button on your controller or keyboard you wish to have mapped to the displayed N64 control. If your controller isn't registering inputs you are missing the required drivers for your controller and must find them and install them. | With the ROM still running, go to <code>Config > Controllers...</code> and set up your controls by clicking on the textboxes and pressing the button on your controller or keyboard you wish to have mapped to the displayed N64 control. If your controller isn't registering inputs you are missing the required drivers for your controller and must find them and install them. | ||
=== Better Analog Stick Accuracy === | |||
''Provided by Retzioka'' | ''Provided by Retzioka'' | ||
Revision as of 23:03, 29 September 2019
BizHawk is a frontend for small number of emulators and is targeted at Tool-Assisted Speedrunners. The advantage of this is that it means the emulators you use on it are targeted towards accuracy so you are unlikely to run into too many bugs that aren't also found when running the games on hardware. A small disadvantage to this is that these emulators also have various debugging tools enabled, which generally means they run slightly slower than emulators without these features enabled. But this also allows further manipulation of the game via Lua scirpts which is how Multiworld functions. This also means that as of right now, BizHawk is the only emulator that can be used for playing Multiworld.
First, you must download BizHawk and the files it requires to have installed to even run.
Installing
Once you have downloaded the files for installation, you have to extract them. Right-click the zip files and choose "Extract All..." and click next a couple of time. Make sure you do this for both zip files you downloaded.
You should now have a folder with a name like bizhawk_prereqs_vX.X where X.X is the version of the prerequisites that you downloaded such as 2.1. This version can be different than the BizHawk version. Open this folder.
Inside there should be a file called bizhawk_prereqs.exe. Double-click this file and click next a couple of times, then wait for all of the files to install. Once the installer has completed you can continue.
Emulator Setup
You can now start up BizHawk. Open the folder BizHawk-X.X.X where X.X.X is the BizHawk version you downloaded, such as 2.3.0. This version can be different than the Prerequisites version. Inside this folder is a file called EmuHawk.exe. Open this file.
You have to load a ROM before you can change N64 emulator-specific settings. Go to File > Open ROM in the menu bar up top. Locate your ROM and open it.
Now that you have loaded a ROM a new menu entry N64 will show up in the menu bar. Ensure N64 > Use Expansion Slot has a check-mark beside it indicating it is enabled. If it does not click on it to enable it. Once you have enabled the setting you have to reboot the core for it to take effect. Navigate to Emulation > Reboot Core to do so.
Controls Setup
With the ROM still running, go to Config > Controllers... and set up your controls by clicking on the textboxes and pressing the button on your controller or keyboard you wish to have mapped to the displayed N64 control. If your controller isn't registering inputs you are missing the required drivers for your controller and must find them and install them.
Better Analog Stick Accuracy
Provided by Retzioka
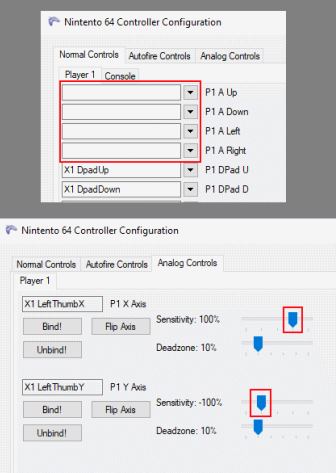
Make sure the first 4 boxes under Normal Controls are empty as displayed above. If they are not, click the box and hit Esc to clear the bind. These settings will force your controller to always input the control stick at 100% rather than by how much you press the stick in a direction. This makes aiming in the game very difficult. You never want these set if you are using a controller with an analog stick which is why we unbind them.
Now go to the Analog Controls tab and click the Bind button.
X-Axis Move your stick Left to Right once
Y-Axis Move your stick from Up to Down once
Be sure to also adjust your sensitivity to make it easier to aim as well. The image above shows an example, but everyone has a different setting that "feels good" to them. Experiment with them, especially once you've found a Bow or Slingshot.
Optional Settings
Hotkey Settings
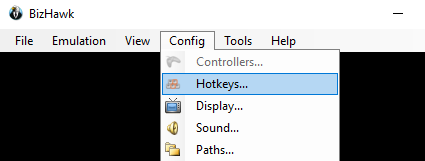
It is strongly recommended to remove most, if not all, of the default hotkeys. Some are bound to your controller by default and can cause frustration while trying to play. Go to Config > Hotkeys..., select a hotkey, and simply press the Esc key on your keyboard to unbind it.
Better Graphics
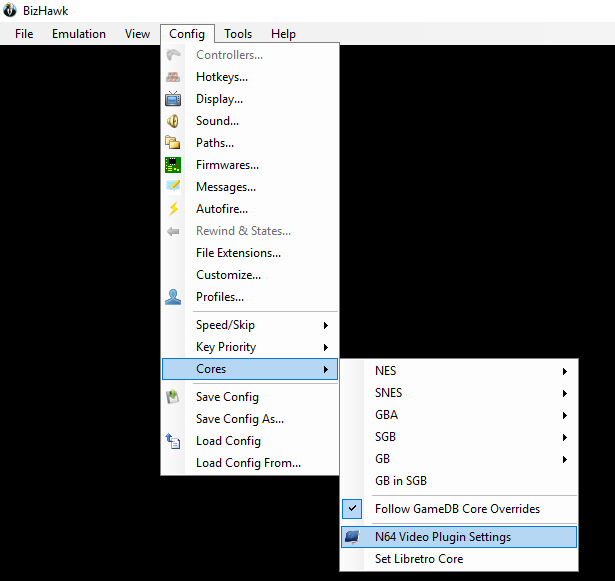
Under Config > Cores > N64 Video Plugin Settings you should see a dropdown box titled Video Resolution. The recommended resolution is 640x480 and the maximum recommended resolution is 800x600. Higher resolutions will affect the performance of the emulator and is a major cause of slowed and laggy gameplay.
If you computer has up-to-date OpenGL drivers (fairly modern Nvidia and AMD cards, and only very, very recent Intel graphics) you should change the Active Video Plugin to GLideN64 as it is the most accurate video plugin. If the game boots to a black screen while after activating this plugin try Glide64 mk2 instead. Use Rice plugin only as a last resort as it is quite inaccurate.
Background Inputs
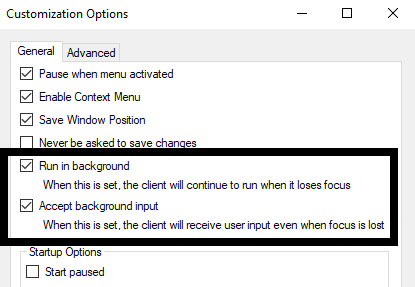
As a Streamer, you may have to click around often. This will make sure that whatever you do, the Emulator will register the inputs from your Controller. Go to Config > Customize... and make sure Run in background and Accept background input are both checked. It is also recommended to uncheck the Pause when menu activated box.
If you selected a high resolution in the previous step your FPS might go down if you click somewhere other than on the Emulator.
Aspect Ratio
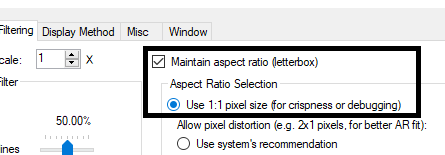
If you decide to make your emulator’s window fullscreen, your game will look stretched. This does not look very nice for either you or your viewers. This will ensure the game will stay in its original 4:3 Ratio. Go to Config > Display and check the Maintain aspect ratio (letterbox) box and select Use 1:1 pixel size.
GameCube Adapter Support
Download drivers for the Official Wii U GameCube Adapter.
If you wish to use your GameCube controller with the Official Wii U GameCube Adapter, connect the black USB end of the Wii U Adapter into your computer. Connect your controller in the controller slot at the far left. Run WiiU-UsbSetup 2015-09-02.exe.
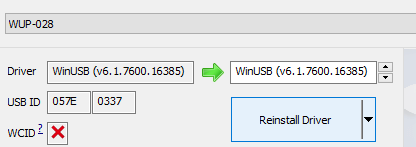
Once the installation starts a new window will appear. In the first box, select WUP-028 and then select Install Driver and proceed to press "Next" until the program asks you to reboot.
After you restart your PC, you will now have a desktop shortcut for Wii U USB GCN Adapter with an icon of a GameCube controller. Open it and click Start. Wait patiently as it installs the proper drivers. You will see it display "Driver successfully started, entering input loop" once it has finished. You will have to repeat this process after every reboot, and if you close out the application entirely. You can close the window now however, and it will minimize and still keep reading input in the background.
This method also works for the Dolphin emulator.
Custom Texture Packs
Here is a guide for installing texture packs.
Note: Texture packs are not allowed during races and you will be disqualified from a race for using them
