No edit summary |
|||
| Line 26: | Line 26: | ||
!width="40%"|Location!!width="30%"|Image!!style="text-align:center"|Logic Notes | !width="40%"|Location!!width="30%"|Image!!style="text-align:center"|Logic Notes | ||
|- | |- | ||
|| KF Sarias Recovery Heart 1 || [[File:Fs kf sarias house recovery hearts.png|400px]] | || KF Sarias Recovery Heart 1</br>KF Sarias Recovery Heart 2</br>KF Sarias Recovery Heart 3</br>KF Sarias Recovery Heart 4 || [[File:Fs kf sarias house recovery hearts.png|400px]] ||style="text-align:center"|True | ||
|- | |- | ||
|} | |} | ||
== KF Kokiri Shop == | == KF Kokiri Shop == | ||
{| border="0" cellpadding="1" cellspacing="1" width=100% | {| border="0" cellpadding="1" cellspacing="1" width=100% | ||
Revision as of 23:46, 15 February 2022
Kokiri Forest
KF Sarias House
| Location | Image | Logic Notes |
|---|---|---|
| KF Sarias Recovery Heart 1 KF Sarias Recovery Heart 2 KF Sarias Recovery Heart 3 KF Sarias Recovery Heart 4 |
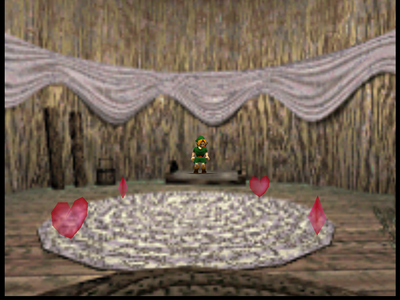 |
True |
KF Kokiri Shop
| Location | Image | Logic Notes |
|---|---|---|
| KF Shop Invisible Rupee | IMAGE_URL_HERE | True |
LW Beyond Mido
| Location | Image | Logic Notes |
|---|---|---|
| LW Under Boulder Rupee | IMAGE_URL_HERE | here(can_blast_or_smash) |
| LW Water Rupee 1 | IMAGE_URL_HERE | is_child and (can_dive or can_use(Boomerang)) |
| LW Water Rupee 2 | IMAGE_URL_HERE | is_child and (can_dive or can_use(Boomerang)) |
| LW Water Rupee 3 | IMAGE_URL_HERE | is_child and (can_dive or can_use(Boomerang)) |
| LW Water Rupee 4 | IMAGE_URL_HERE | is_child and (can_dive or can_use(Boomerang)) |
| LW Water Rupee 5 | IMAGE_URL_HERE | is_child and (can_dive or can_use(Boomerang)) |
| LW Water Rupee 6 | IMAGE_URL_HERE | is_child and (can_dive or can_use(Boomerang)) |
| LW Water Rupee 7 | IMAGE_URL_HERE | is_child and (can_dive or can_use(Boomerang)) |
| LW Water Rupee 8 | IMAGE_URL_HERE | is_child and (can_dive or can_use(Boomerang)) |
Lake Hylia
| Location | Image | Logic Notes |
|---|---|---|
| LH Underwater Rupee 1 | IMAGE_URL_HERE | is_child |
| LH Underwater Rupee 2 | IMAGE_URL_HERE | is_child and can_dive |
| LH Underwater Rupee 3 | IMAGE_URL_HERE | is_child and can_dive |
LH Lab
| Location | Image | Logic Notes |
|---|---|---|
| LH Lab Dive Rupee 1 | IMAGE_URL_HERE | (Progressive_Scale, 2) or can_use(Iron_Boots) |
| LH Lab Dive Rupee 2 | IMAGE_URL_HERE | (Progressive_Scale, 2) or can_use(Iron_Boots) |
| LH Lab Dive Rupee 3 | IMAGE_URL_HERE | (Progressive_Scale, 2) or can_use(Iron_Boots) |
Graveyard Dampes Grave
| Location | Image | Logic Notes |
|---|---|---|
| Graveyard Dampe Race Rupee 1 | IMAGE_URL_HERE | True |
| Graveyard Dampe Race Rupee 2 | IMAGE_URL_HERE | True |
| Graveyard Dampe Race Rupee 3 | IMAGE_URL_HERE | True |
| Graveyard Dampe Race Rupee 4 | IMAGE_URL_HERE | True |
| Graveyard Dampe Race Rupee 5 | IMAGE_URL_HERE | True |
| Graveyard Dampe Race Rupee 6 | IMAGE_URL_HERE | True |
| Graveyard Dampe Race Rupee 7 | IMAGE_URL_HERE | True |
| Graveyard Dampe Race Rupee 8 | IMAGE_URL_HERE | True |
Death Mountain
| Location | Image | Logic Notes |
|---|---|---|
| DMT Rock Red Rupee | IMAGE_URL_HERE | (here(is_child) and has_explosives) or (here(is_child) and (here(is_adult) and can_use(Megaton_Hammer))) |
| DMT Rock Blue Rupee | IMAGE_URL_HERE | here(is_child) and has_explosives |
Goron City
| Location | Image | Logic Notes |
|---|---|---|
| GC Spinning Pot Bomb Drop 1 | IMAGE_URL_HERE | is_child and 'Goron City Child Fire' and (Bombs or (Progressive_Strength_Upgrade and logic_goron_city_pot_with_strength) or (has_bombchus and logic_goron_city_pot)) |
| GC Spinning Pot Bomb Drop 2 | IMAGE_URL_HERE | is_child and 'Goron City Child Fire' and (Bombs or (Progressive_Strength_Upgrade and logic_goron_city_pot_with_strength) or (has_bombchus and logic_goron_city_pot)) |
| GC Spinning Pot Bomb Drop 3 | IMAGE_URL_HERE | is_child and 'Goron City Child Fire' and (Bombs or (Progressive_Strength_Upgrade and logic_goron_city_pot_with_strength) or (has_bombchus and logic_goron_city_pot)) |
| GC Spinning Pot Rupee Drop 1 | IMAGE_URL_HERE | is_child and 'Goron City Child Fire' and (Bombs or (Progressive_Strength_Upgrade and logic_goron_city_pot_with_strength) or (has_bombchus and logic_goron_city_pot)) |
| GC Spinning Pot Rupee Drop 2 | IMAGE_URL_HERE | is_child and 'Goron City Child Fire' and (Bombs or (Progressive_Strength_Upgrade and logic_goron_city_pot_with_strength) or (has_bombchus and logic_goron_city_pot)) |
| GC Spinning Pot Rupee Drop 3 | IMAGE_URL_HERE | is_child and 'Goron City Child Fire' and (Bombs or (Progressive_Strength_Upgrade and logic_goron_city_pot_with_strength) or (has_bombchus and logic_goron_city_pot)) |
| GC Spinning Pot PoH Drop Rupee 1 | IMAGE_URL_HERE | is_child and 'Goron City Child Fire' and (Bombs or (Progressive_Strength_Upgrade and logic_goron_city_pot_with_strength) or (has_bombchus and logic_goron_city_pot)) |
| GC Spinning Pot PoH Drop Rupee 2 | IMAGE_URL_HERE | is_child and 'Goron City Child Fire' and (Bombs or (Progressive_Strength_Upgrade and logic_goron_city_pot_with_strength) or (has_bombchus and logic_goron_city_pot)) |
DMC Pierre Platform
| Location | Image | Logic Notes |
|---|---|---|
| DMC Pierre Rupee Circle Green Rupee 1 | IMAGE_URL_HERE | here(is_adult) |
| DMC Pierre Rupee Circle Green Rupee 2 | IMAGE_URL_HERE | here(is_adult) |
| DMC Pierre Rupee Circle Green Rupee 3 | IMAGE_URL_HERE | here(is_adult) |
| DMC Pierre Rupee Circle Green Rupee 4 | IMAGE_URL_HERE | here(is_adult) |
| DMC Pierre Rupee Circle Green Rupee 5 | IMAGE_URL_HERE | here(is_adult) |
| DMC Pierre Rupee Circle Green Rupee 6 | IMAGE_URL_HERE | here(is_adult) |
| DMC Pierre Rupee Circle Red Rupee | IMAGE_URL_HERE | here(is_adult) |
DMC Central Nearby
| Location | Image | Logic Notes |
|---|---|---|
| DMC Lower Red Rupee 1 | IMAGE_URL_HERE | here(is_child) |
| DMC Lower Red Rupee 2 | IMAGE_URL_HERE | here(is_child) |
| DMC Lower Blue Rupee 1 | IMAGE_URL_HERE | here(is_child) |
| DMC Lower Blue Rupee 2 | IMAGE_URL_HERE | here(is_child) |
| DMC Lower Blue Rupee 3 | IMAGE_URL_HERE | here(is_child) |
| DMC Lower Blue Rupee 4 | IMAGE_URL_HERE | here(is_child) |
| DMC Lower Blue Rupee 5 | IMAGE_URL_HERE | here(is_child) |
| DMC Lower Blue Rupee 6 | IMAGE_URL_HERE | here(is_child) |
Zora River
| Location | Image | Logic Notes |
|---|---|---|
| ZR Waterfall Rupee 1 | IMAGE_URL_HERE | is_adult |
| ZR Waterfall Rupee 2 | IMAGE_URL_HERE | is_adult |
| ZR Waterfall Rupee 3 | IMAGE_URL_HERE | is_adult |
| ZR Waterfall Rupee 4 | IMAGE_URL_HERE | is_adult |
Zoras Fountain
| Location | Image | Logic Notes |
|---|---|---|
| ZF Bottom Freestanding Rupee 1 | IMAGE_URL_HERE | is_adult and Iron_Boots and (logic_fewer_tunic_requirements or can_use(Zora_Tunic)) |
| ZF Bottom Freestanding Rupee 2 | IMAGE_URL_HERE | is_adult and Iron_Boots and (logic_fewer_tunic_requirements or can_use(Zora_Tunic)) |
| ZF Bottom Freestanding Rupee 3 | IMAGE_URL_HERE | is_adult and Iron_Boots and (logic_fewer_tunic_requirements or can_use(Zora_Tunic)) |
| ZF Bottom Freestanding Rupee 4 | IMAGE_URL_HERE | is_adult and Iron_Boots and (logic_fewer_tunic_requirements or can_use(Zora_Tunic)) |
| ZF Bottom Freestanding Rupee 5 | IMAGE_URL_HERE | is_adult and Iron_Boots and (logic_fewer_tunic_requirements or can_use(Zora_Tunic)) |
| ZF Bottom Freestanding Rupee 6 | IMAGE_URL_HERE | is_adult and Iron_Boots and (logic_fewer_tunic_requirements or can_use(Zora_Tunic)) |
| ZF Bottom Freestanding Rupee 7 | IMAGE_URL_HERE | is_adult and Iron_Boots and (logic_fewer_tunic_requirements or can_use(Zora_Tunic)) |
| ZF Bottom Freestanding Rupee 8 | IMAGE_URL_HERE | is_adult and Iron_Boots and (logic_fewer_tunic_requirements or can_use(Zora_Tunic)) |
| ZF Bottom Freestanding Rupee 9 | IMAGE_URL_HERE | is_adult and Iron_Boots and (logic_fewer_tunic_requirements or can_use(Zora_Tunic)) |
| ZF Bottom Freestanding Rupee 10 | IMAGE_URL_HERE | is_adult and Iron_Boots and (logic_fewer_tunic_requirements or can_use(Zora_Tunic)) |
| ZF Bottom Freestanding Rupee 11 | IMAGE_URL_HERE | is_adult and Iron_Boots and (logic_fewer_tunic_requirements or can_use(Zora_Tunic)) |
| ZF Bottom Freestanding Rupee 12 | IMAGE_URL_HERE | is_adult and Iron_Boots and (logic_fewer_tunic_requirements or can_use(Zora_Tunic)) |
| ZF Bottom Freestanding Rupee 13 | IMAGE_URL_HERE | is_adult and Iron_Boots and (logic_fewer_tunic_requirements or can_use(Zora_Tunic)) |
| ZF Bottom Freestanding Rupee 14 | IMAGE_URL_HERE | is_adult and Iron_Boots and (logic_fewer_tunic_requirements or can_use(Zora_Tunic)) |
| ZF Bottom Freestanding Rupee 15 | IMAGE_URL_HERE | is_adult and Iron_Boots and (logic_fewer_tunic_requirements or can_use(Zora_Tunic)) |
| ZF Bottom Freestanding Rupee 16 | IMAGE_URL_HERE | is_adult and Iron_Boots and (logic_fewer_tunic_requirements or can_use(Zora_Tunic)) |
| ZF Bottom Freestanding Rupee 17 | IMAGE_URL_HERE | is_adult and Iron_Boots and (logic_fewer_tunic_requirements or can_use(Zora_Tunic)) |
| ZF Bottom Freestanding Rupee 18 | IMAGE_URL_HERE | is_adult and Iron_Boots and (logic_fewer_tunic_requirements or can_use(Zora_Tunic)) |
DMT Cow Grotto
| Location | Image | Logic Notes |
|---|---|---|
| DMT Cow Grotto Rupee Circle Green Rupee 1 | IMAGE_URL_HERE | True |
| DMT Cow Grotto Rupee Circle Green Rupee 2 | IMAGE_URL_HERE | True |
| DMT Cow Grotto Rupee Circle Green Rupee 3 | IMAGE_URL_HERE | True |
| DMT Cow Grotto Rupee Circle Green Rupee 4 | IMAGE_URL_HERE | True |
| DMT Cow Grotto Rupee Circle Green Rupee 5 | IMAGE_URL_HERE | True |
| DMT Cow Grotto Rupee Circle Green Rupee 6 | IMAGE_URL_HERE | True |
| DMT Cow Grotto Rupee Circle Red Rupee | IMAGE_URL_HERE | True |
| DMT Cow Grotto Recovery Heart 1 | IMAGE_URL_HERE | True |
| DMT Cow Grotto Recovery Heart 2 | IMAGE_URL_HERE | True |
| DMT Cow Grotto Recovery Heart 3 | IMAGE_URL_HERE | True |
| DMT Cow Grotto Recovery Heart 4 | IMAGE_URL_HERE | True |
GV Octorok Grotto
| Location | Image | Logic Notes |
|---|---|---|
| GV Octorok Grotto Red Rupee | IMAGE_URL_HERE | True |
| GV Octorok Grotto Blue Rupee 1 | IMAGE_URL_HERE | True |
| GV Octorok Grotto Blue Rupee 2 | IMAGE_URL_HERE | True |
| GV Octorok Grotto Blue Rupee 3 | IMAGE_URL_HERE | True |
| GV Octorok Grotto Green Rupee 1 | IMAGE_URL_HERE | True |
| GV Octorok Grotto Green Rupee 2 | IMAGE_URL_HERE | True |
| GV Octorok Grotto Green Rupee 3 | IMAGE_URL_HERE | True |
| GV Octorok Grotto Green Rupee 4 | IMAGE_URL_HERE | True |
Deku Tree Lobby
| Location | Image | Logic Notes |
|---|---|---|
| Deku Tree Walk the Plank Recovery Heart | IMAGE_URL_HERE | True |
| Deku Tree Leap Recovery Heart | IMAGE_URL_HERE | is_adult or can_child_attack or Nuts |
Deku Tree Boss Room
| Location | Image | Logic Notes |
|---|---|---|
| Deku Tree 2-3-1 Scrubs Recovery Heart 1 | IMAGE_URL_HERE | True |
| Deku Tree 2-3-1 Scrubs Recovery Heart 2 | IMAGE_URL_HERE | True |
| Deku Tree 2-3-1 Scrubs Recovery Heart 3 | IMAGE_URL_HERE | True |
Dodongos Cavern Lobby
| Location | Image | Logic Notes |
|---|---|---|
| Dodongos Cavern Lizalfos Hidden Recovery Heart | IMAGE_URL_HERE | here(can_blast_or_smash or Progressive_Strength_Upgrade) or is_adult |
Dodongos Cavern Climb
| Location | Image | Logic Notes |
|---|---|---|
| Dodongos Cavern Lizalfos Recovery Heart 1 | IMAGE_URL_HERE | True |
| Dodongos Cavern Lizalfos Recovery Heart 2 | IMAGE_URL_HERE | True |
| Dodongos Cavern Behind Block Recovery Heart | IMAGE_URL_HERE | True |
Forest Temple Well
| Location | Image | Logic Notes |
|---|---|---|
| Forest Temple Well Recovery Heart 1 | IMAGE_URL_HERE | True |
| Forest Temple Well Recovery Heart 2 | IMAGE_URL_HERE | True |
Forest Temple Outside Upper Ledge
| Location | Image | Logic Notes |
|---|---|---|
| Forest Temple Courtyard Recovery Heart 1 | IMAGE_URL_HERE | True |
| Forest Temple Courtyard Recovery Heart 2 | IMAGE_URL_HERE | True |
Fire Temple Big Lava Room
| Location | Image | Logic Notes |
|---|---|---|
| Fire Temple Elevator Room Recovery Heart 1 | IMAGE_URL_HERE | (Small_Key_Fire_Temple, 3) |
| Fire Temple Elevator Room Recovery Heart 2 | IMAGE_URL_HERE | (Small_Key_Fire_Temple, 3) |
| Fire Temple Elevator Room Recovery Heart 3 | IMAGE_URL_HERE | (Small_Key_Fire_Temple, 3) |
Fire Temple Middle
| Location | Image | Logic Notes |
|---|---|---|
| Fire Temple Eye Switch Room Recovery Heart 1 | IMAGE_URL_HERE | (Small_Key_Fire_Temple, 5) |
| Fire Temple Eye Switch Room Recovery Heart 2 | IMAGE_URL_HERE | (Small_Key_Fire_Temple, 5) |
| Fire Temple Eye Switch Room Recovery Heart 3 | IMAGE_URL_HERE | (Small_Key_Fire_Temple, 5) |
| Fire Temple Moving Fire Room Recovery Heart 1 | IMAGE_URL_HERE | (Small_Key_Fire_Temple, 6) |
| Fire Temple Moving Fire Room Recovery Heart 2 | IMAGE_URL_HERE | (Small_Key_Fire_Temple, 6) |
| Fire Temple Moving Fire Room Recovery Heart 3 | IMAGE_URL_HERE | (Small_Key_Fire_Temple, 6) |
Water Temple Dark Link Region
| Location | Image | Logic Notes |
|---|---|---|
| Water Temple River Recovery Heart 1 | IMAGE_URL_HERE | can_play(Song_of_Time) |
| Water Temple River Recovery Heart 2 | IMAGE_URL_HERE | can_play(Song_of_Time) |
| Water Temple River Recovery Heart 3 | IMAGE_URL_HERE | can_play(Song_of_Time) |
| Water Temple River Recovery Heart 4 | IMAGE_URL_HERE | can_play(Song_of_Time) |
Shadow Temple Huge Pit
| Location | Image | Logic Notes |
|---|---|---|
| Shadow Temple Invisible Blades Recovery Heart 1 | IMAGE_URL_HERE | can_play(Song_of_Time) |
| Shadow Temple Invisible Blades Recovery Heart 2 | IMAGE_URL_HERE | can_play(Song_of_Time) |
Shadow Temple Boat
| Location | Image | Logic Notes |
|---|---|---|
| Shadow Temple Before Boat Freestanding Recovery Heart 1 | IMAGE_URL_HERE | can_use(Distant_Scarecrow) and (Small_Key_Shadow_Temple, 4) |
| Shadow Temple Before Boat Freestanding Recovery Heart 2 | IMAGE_URL_HERE | can_use(Distant_Scarecrow) and (Small_Key_Shadow_Temple, 4) |
Shadow Temple Beyond Boat
| Location | Image | Logic Notes |
|---|---|---|
| Shadow Temple After Boat Freestanding Recovery Heart Upper 1 | IMAGE_URL_HERE | can_use(Distant_Scarecrow) |
| Shadow Temple After Boat Freestanding Recovery Heart Upper 2 | IMAGE_URL_HERE | can_use(Distant_Scarecrow) |
| Shadow Temple After Boat Freestanding Recovery Heart Lower | IMAGE_URL_HERE | can_use(Distant_Scarecrow) or ((Bow or (logic_shadow_statue and has_bombchus) or shadow_temple_shortcuts) and can_play(Song_of_Time)) |
| Shadow Temple 3 Spinning Pots Rupee 1 | IMAGE_URL_HERE | Bomb_Bag or Progressive_Strength_Upgrade |
| Shadow Temple 3 Spinning Pots Rupee 2 | IMAGE_URL_HERE | Bomb_Bag or Progressive_Strength_Upgrade |
| Shadow Temple 3 Spinning Pots Rupee 3 | IMAGE_URL_HERE | Bomb_Bag or Progressive_Strength_Upgrade |
| Shadow Temple 3 Spinning Pots Rupee 4 | IMAGE_URL_HERE | Bomb_Bag or Progressive_Strength_Upgrade |
| Shadow Temple 3 Spinning Pots Rupee 5 | IMAGE_URL_HERE | Bomb_Bag or Progressive_Strength_Upgrade |
| Shadow Temple 3 Spinning Pots Rupee 6 | IMAGE_URL_HERE | Bomb_Bag or Progressive_Strength_Upgrade |
| Shadow Temple 3 Spinning Pots Rupee 7 | IMAGE_URL_HERE | Bomb_Bag or Progressive_Strength_Upgrade |
| Shadow Temple 3 Spinning Pots Rupee 8 | IMAGE_URL_HERE | Bomb_Bag or Progressive_Strength_Upgrade |
| Shadow Temple 3 Spinning Pots Rupee 9 | IMAGE_URL_HERE | Bomb_Bag or Progressive_Strength_Upgrade |
Spirit Temple Beyond Final Locked Door
| Location | Image | Logic Notes |
|---|---|---|
| Spirit Temple Shifting Wall Recovery Heart 1 | IMAGE_URL_HERE | Progressive_Hookshot |
| Spirit Temple Shifting Wall Recovery Heart 2 | IMAGE_URL_HERE | Progressive_Hookshot |
Ganons Castle Fire Trial
| Location | Image | Logic Notes |
|---|---|---|
| Ganons Castle Fire Trial Recovery Heart | IMAGE_URL_HERE | True |
Ganons Castle Shadow Trial
| Location | Image | Logic Notes |
|---|---|---|
| Ganons Castle Shadow Trial Recovery Heart 1 | IMAGE_URL_HERE | can_use(Lens_of_Truth) and ( can_use(Fire_Arrows) or (can_use(Longshot) and (Hover_Boots or can_use(Dins_Fire)))) |
| Ganons Castle Shadow Trial Recovery Heart 2 | IMAGE_URL_HERE | can_use(Lens_of_Truth) and ( can_use(Fire_Arrows) or (can_use(Longshot) and (Hover_Boots or can_use(Dins_Fire)))) |
| Ganons Castle Shadow Trial Recovery Heart 3 | IMAGE_URL_HERE | can_use(Lens_of_Truth) and ( can_use(Fire_Arrows) or (can_use(Longshot) and (Hover_Boots or can_use(Dins_Fire)))) |
Ganons Castle Spirit Trial
| Location | Image | Logic Notes |
|---|---|---|
| Ganons Castle Spirit Trial Recovery Heart | IMAGE_URL_HERE | True |
Bottom of the Well Main Area
| Location | Image | Logic Notes |
|---|---|---|
| Bottom of the Well Coffin Recovery Heart 1 | IMAGE_URL_HERE | Sticks or can_use(Dins_Fire) |
| Bottom of the Well Coffin Recovery Heart 2 | IMAGE_URL_HERE | True |
| Bottom of the Well Center Room Pit Fall Rupee 1 | IMAGE_URL_HERE | logic_lens_botw or can_use(Lens_of_Truth) |
| Bottom of the Well Center Room Pit Fall Rupee 2 | IMAGE_URL_HERE | logic_lens_botw or can_use(Lens_of_Truth) |
| Bottom of the Well Center Room Pit Fall Rupee 3 | IMAGE_URL_HERE | logic_lens_botw or can_use(Lens_of_Truth) |
| Bottom of the Well Center Room Pit Fall Rupee 4 | IMAGE_URL_HERE | logic_lens_botw or can_use(Lens_of_Truth) |
| Bottom of the Well Center Room Pit Fall Rupee 5 | IMAGE_URL_HERE | logic_lens_botw or can_use(Lens_of_Truth) |
Gerudo Training Ground Lobby
| Location | Image | Logic Notes |
|---|---|---|
| Gerudo Training Ground Beamos Recovery Heart 1 | IMAGE_URL_HERE | True |
| Gerudo Training Ground Beamos Recovery Heart 2 | IMAGE_URL_HERE | True |
Ice Cavern
| Location | Image | Logic Notes |
|---|---|---|
| Ice Cavern Freestanding Blue Rupee | IMAGE_URL_HERE | Blue_Fire |
| Ice Cavern Map Room Recovery Heart 1 | IMAGE_URL_HERE | is_adult |
| Ice Cavern Map Room Recovery Heart 2 | IMAGE_URL_HERE | is_adult |
| Ice Cavern Map Room Recovery Heart 3 | IMAGE_URL_HERE | is_adult |
| Ice Cavern Block Room Red Rupee 1 | IMAGE_URL_HERE | (is_adult and can_play(Song_of_Time)) or (is_child and can_use(Boomerang)) |
| Ice Cavern Block Room Red Rupee 2 | IMAGE_URL_HERE | (is_adult and can_play(Song_of_Time)) or (is_child and can_use(Boomerang)) |
| Ice Cavern Block Room Red Rupee 3 | IMAGE_URL_HERE | (is_adult and can_play(Song_of_Time)) or (is_child and can_use(Boomerang)) |

