m (→Emulators: highlight pj64 2+ banned for races message) |
(Add setup instructions for standalone download and source code versions of the randomizer) |
||
| Line 1: | Line 1: | ||
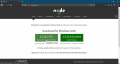
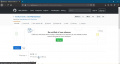
It is | It is strongly recommended to use the online generator on the website instead of using the download or source code versions of the randomizer. Simply go to https://ootrandomizer.com and click on the <samp><kbd>Play Now</kbd></samp> button. The [[#Video Tutorial|video tutorial]] can walk you through using the website. The [[Readme]] is available if you need to find out what the different options do. You can also check out the [[Changelog]] to see what changes have happened between randomizer versions. | ||
[[File:Setup-Website-PlayNow.jpeg|none|thumb|Click the <samp>Play Now</samp> button on the website to open the online generator.]] | |||
Ocarina of Time Randomizer is compatible with Nintendo 64 hardware through use of a flash cart such as the Everdrive 64. It is also compatible with the Wii Virtual Console via the use of [https://wii.guide/str2hax Homebrew and WAD injection] or through [https://wiiu.hacks.guide/vwii-modding Wii U vWii]. | |||
Some of the base files (ROMs, Wii common key, etc.) that are needed to play Ocarina of Time Randomizer are copyrighted and will not be provided by the community nor staff. | Some of the base files (ROMs, Wii common key, etc.) that are needed to play Ocarina of Time Randomizer are copyrighted and will not be provided by the community nor staff. | ||
''If you want to run the [https://ootrandomizer.com/downloads standalone download] version of the randomizer, you should skip to [[#Install Python|installing Python]].'' | |||
''If you want to run the [https://github.com/TestRunnerSRL/OoT-Randomizer/tree/master source code] or [https://github.com/TestRunnerSRL/OoT-Randomizer/tree/Dev Dev] version of randomizer, you should skip to [[#Install Node.js|installing Node.js]].'' | |||
'''TreZc0_''' recorded a setup video that will cover most questions: <youtube dimensions="480x270">https://www.youtube.com/watch?v=ojVXc3IiPxo</youtube> | == Video Tutorial == | ||
'''TreZc0_''' recorded a setup video that will cover most questions when using the [https://ootrandomizer.com online generator]. | |||
<youtube dimensions="480x270">https://www.youtube.com/watch?v=ojVXc3IiPxo</youtube> | |||
=== | Once you have viewed the video and generated a randomizer ROM file, head to [[#Playing the Randomizer|playing the randomizer]]. | ||
== Windows Setup == | |||
The [https://ootrandomizer.com online generator] will work on a variety of devices and is the recommended option. The randomizer itself will work on Windows, macOS, and Linux. The ROM will work on any device that has a Nintendo 64 emulator available. However, the following setup steps focus on getting the randomizer working on the Windows operating system. | |||
=== Install Node.js === | |||
As of version 4.14 of the randomizer, the source code and dev versions of the randomizer require [https://nodejs.org/en/ Node.js] to be installed. | |||
Open the [https://nodejs.org/en/ Node.js website] and click on the <samp><kbd>LTS</kbd></samp> button on their home page.<sup>1</sup> Save the <samp>msi</samp> installer file then, locate it in your <samp>Downloads</samp> folder, or wherever you saved it. Launch the installer by double-clicking it. Click <samp><kbd>Next</kbd></samp> until you get to the <samp>Tools for Native Modules</samp> screen. Make sure the <samp>Automatically install the necessary tools. [...]</samp> checkbox is '''not''' checked.<sup>2</sup> Click <samp><kbd>Next</kbd></samp> once you have made sure of this. Next click the <samp><kbd>Install</kbd></samp> button, then once that is completed, click the <samp><kbd>Finish</kbd></samp> button. | |||
<gallery> | |||
File:Setup-NodeJs-LTSButton.jpeg|1. Choose the <samp>LTS</samp> version which was <samp>12.16.2</samp> here, but may be different for you. Do '''not''' click the <samp>Current version</samp> button. | |||
File:Setup-NodeJs-NativeModulesUnchecked.jpeg|2. Make sure the checkbox is unchecked before clicking <samp>Next</samp>. | |||
</gallery> | |||
=== Install Python === | |||
To run the randomizer on your computer you will need to install [https://www.python.org Python]. This is not needed when using the [https://ootrandomizer.com online generator] but in all other cases you '''must''' have Python installed. The randomizer requires at least <samp>Python 3.6.0</samp> installed, however we recommend installing the latest stable version of Python available when you install it. | |||
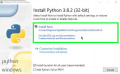
Go to the [https://www.python.org Python website] and hover your mouse over the <samp>Downloads</samp> tab. A little dialog will appear and should have a <samp>Download for Windows</samp> section displayed. Click on the button labeled <samp>Python</samp> with a version number next to it.<sup>1</sup> Save the <samp>exe</samp> installer file, then locate it in your <samp>Downloads</samp> folder, or wherever you saved it. Launch the installer by double-clicking it. Click <samp><kbd>Customize installation</kbd></samp> on the installer.<sup>2</sup> | |||
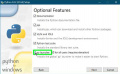
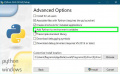
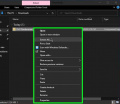
In the <samp>Optional Features</samp> section of the installer, ensure that <samp><kbd>py launcher</kbd></samp> is selected.<sup>3</sup> If you wish to run older versions of the randomizer prior to version 4.14, ensure that you also select <samp><kbd>tcl/tk and IDLE</kbd></samp>. Once you have the options you want selected, click <samp><kbd>Next</kbd></samp>. In the <samp>Advanced Options</samp> section of the installer, make sure that you have the <samp><kbd>Associate files with Python (requires the py launcher)</kbd></samp> checkbox selected, and the <samp><kbd>Add Python to environment variables</kbd></samp> checkbox selected.<sup>4</sup> Once you have made sure these settings are selected, click <samp><kbd>Install</kbd></samp>. Once the install finishes, you can click the <samp><kbd>Close</kbd></samp> button. | |||
<gallery> | |||
File:Setup-Python-DownloadPythonButton.jpeg|1. Click this button. In this case the latest version was <samp>3.8.2</samp> but the version displayed for you is the one you want. | |||
File:Setup-Python-CustomizeInstallation.jpeg|2. Choose to <samp>Customize installation</samp>. | |||
File:Setup-Python-PyLauncher.jpeg|3. Make sure that the <samp>py launcher</samp> checkbox is checked. | |||
File:Setup-Python-AdvancedOptions.jpeg|4. You want both <samp>Associate files with Python</samp> and <samp>Add Python to environment variables</samp> checked before clicking <samp>Install</samp>. | |||
</gallery> | |||
== Downloading the Randomizer == | |||
It is strongly recommended to use the [https://ootrandomizer.com online generator] instead of using the download or source code versions of the randomizer. If you are sure that you want to use a downloaded version, you can follow the instructions for the [[#Standalone Download|standalone download]] version or the [[#Source Code|source code and Dev]] version of the randomizer. | |||
=== Standalone Download === | |||
You can choose to download the standalone download version of the randomzier by going to the [https://ootrandomizer.com/downloads downloads page on the website] and choosing the appropriate download for your operating system. The provided installers should install the randomizer to the appropriate place for your operating system and you should be able to launch the randomizer from your operating system's application launcher—Start Menu in Windows, Applications folder in macOS, and whichever application launcher you prefer for Linux. ''You must have Python 3.6 or higher installed for the standalone download randomizer to work''. | |||
Once you have generated a randomizer ROM file, head to [[#Playing the Randomizer|playing the randomizer]]. | |||
==== Windows Troubleshooting ==== | |||
[[File:Setup-Standalone-WindowsSmartScreen.jpeg|none|thumb|Click <samp>More info</samp> then <samp>Run anyway</samp> to run the installer.]] | |||
Often when a new version of the randomizer is released the standalone download is not trusted by the Windows operating system. When you try to run the installer it will pop up a Windows Smartscreen window. All you have to do is click <samp><kbd>More info</kbd></samp> and then the <samp><kbd>Run anyway</kbd></samp> button. The installer will then launch and install the randomizer. | |||
=== Source Code === | |||
You can download either the release source code, or the development (Dev) branch source code to run the randomizer. Most users will want to use the [[#Standalone Download|standalone download]] for the release version, so this section will focus on running the latest development version from source code. ''You must have the latest Node.js LTS version and Python 3.6 or higher installed for the source code version of the randomizer to work''. | |||
Head to the [https://ootrandomizer.com website] and in the navigation bar at the top, click on <samp><kbd>Resources</kbd></samp> and then choose the <samp><kbd>Dev Github</kbd></samp> option.<sup>1</sup> Next click on the <samp><kbd>releases</kbd></samp> button to reach the page with all of the randomizer releases.<sup>2</sup> Click on the <samp><kbd>zip</kbd></samp> button for the latest development version of the randomizer to download it.<sup>3</sup> ''The Dev branch of the randomizer is known to be unstable. The latest version may not work properly. If you run into issues you may want to join the [https://discord.gg/ootrandomizer Discord server] and ask which Dev version of the randomizer you should download''. | |||
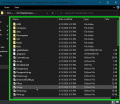
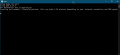
Locate the <samp>zip</samp> file you just downloaded in your <samp>Downloads</samp> folder, or wherever you saved it. <kbd>Right-click</kbd> the file and click <samp><kbd>Extract All...</kbd></samp> and extract the files from the zip archive.<sup>4</sup> A new folder should appear which may contain another folder inside. Open the folders until you see a folder with many folders and files inside. Locate the <samp>Gui.py</samp> file inside and <kbd>Double-click</kbd> it to launch the randomizer.<sup>5</sup> The first time you run the randomizer many files need to be downloaded from the internet. Wait patiently as they download.<sup>6</sup> ''This process will be faster every time you run the randomizer after this since it will only have to download the files once. Even if you download a new version it will be slightly faster as most of the files will be located in the Node.js cache and most will simply be used from there''. | |||
The randomizer will launch once the initial installation has finished. Once you have generated a randomizer ROM file, head to [[#Playing the Randomizer|playing the randomizer]]. | |||
<gallery> | |||
File:Setup-SourceCode-GitHubLink.jpeg|1. Open the <samp>Dev Github</samp> link to open the GitHub page for the main fork of the randomizer. | |||
File:Setup-SourceCode-GitHubReleases.jpeg|2. The <samp>releases</samp> button will display all of the different randomizer versions. | |||
File:Setup-SourceCode-GitHubZip.jpeg|3. A <samp>zip</samp> button should appear on the top release that you can click on. | |||
File:Setup-SourceCode-WindowsExtract.jpeg|4. On Windows, choose to <samp>Extract All...</samp> from the zip file. | |||
File:Setup-SourceCode-Gui-py.jpeg|5. Run the <samp>Gui.py</samp> Python script. | |||
File:Setup-SourceCode-InitialInstall.jpeg|6. Wait patiently as Node.js downloads the randomizer's dependencies. | |||
</gallery> | |||
== Playing the Randomizer == | |||
===Emulators=== | ===Emulators=== | ||
The Ocarina of Time Randomizer can be played on PC via an emulator. Given the emulation quality difference between emulators, not every emulator can be recommended. | The Ocarina of Time Randomizer can be played on PC via an emulator. Given the emulation quality difference between emulators, not every emulator can be recommended. | ||
| Line 30: | Line 88: | ||
Keep in mind that Project64 is not recommended as it is very inaccurate in its emulation, and has known compatibility issues with Ocarina of Time Randomizer. '''<span style="color:red">Project64 2+ is also banned for races and you will be disqualified if you race using it.</span>''' | Keep in mind that Project64 is not recommended as it is very inaccurate in its emulation, and has known compatibility issues with Ocarina of Time Randomizer. '''<span style="color:red">Project64 2+ is also banned for races and you will be disqualified if you race using it.</span>''' | ||
=== Patch Files === | |||
If someone shares a ZPF or ZPFZ file with you, these are [[Patch Files]]. They are a copyright-free method to share randomizer seeds with people. The [[Patch Files|patch files]] page will explain what to do with them. | |||
Revision as of 17:17, 15 April 2020
It is strongly recommended to use the online generator on the website instead of using the download or source code versions of the randomizer. Simply go to https://ootrandomizer.com and click on the Play Now button. The video tutorial can walk you through using the website. The Readme is available if you need to find out what the different options do. You can also check out the Changelog to see what changes have happened between randomizer versions.

Ocarina of Time Randomizer is compatible with Nintendo 64 hardware through use of a flash cart such as the Everdrive 64. It is also compatible with the Wii Virtual Console via the use of Homebrew and WAD injection or through Wii U vWii.
Some of the base files (ROMs, Wii common key, etc.) that are needed to play Ocarina of Time Randomizer are copyrighted and will not be provided by the community nor staff.
If you want to run the standalone download version of the randomizer, you should skip to installing Python.
If you want to run the source code or Dev version of randomizer, you should skip to installing Node.js.
Video Tutorial
TreZc0_ recorded a setup video that will cover most questions when using the online generator.
Once you have viewed the video and generated a randomizer ROM file, head to playing the randomizer.
Windows Setup
The online generator will work on a variety of devices and is the recommended option. The randomizer itself will work on Windows, macOS, and Linux. The ROM will work on any device that has a Nintendo 64 emulator available. However, the following setup steps focus on getting the randomizer working on the Windows operating system.
Install Node.js
As of version 4.14 of the randomizer, the source code and dev versions of the randomizer require Node.js to be installed.
Open the Node.js website and click on the LTS button on their home page.1 Save the msi installer file then, locate it in your Downloads folder, or wherever you saved it. Launch the installer by double-clicking it. Click Next until you get to the Tools for Native Modules screen. Make sure the Automatically install the necessary tools. [...] checkbox is not checked.2 Click Next once you have made sure of this. Next click the Install button, then once that is completed, click the Finish button.
-
1. Choose the LTS version which was 12.16.2 here, but may be different for you. Do not click the Current version button.
-
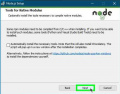
2. Make sure the checkbox is unchecked before clicking Next.


Install Python
To run the randomizer on your computer you will need to install Python. This is not needed when using the online generator but in all other cases you must have Python installed. The randomizer requires at least Python 3.6.0 installed, however we recommend installing the latest stable version of Python available when you install it.
Go to the Python website and hover your mouse over the Downloads tab. A little dialog will appear and should have a Download for Windows section displayed. Click on the button labeled Python with a version number next to it.1 Save the exe installer file, then locate it in your Downloads folder, or wherever you saved it. Launch the installer by double-clicking it. Click Customize installation on the installer.2
In the Optional Features section of the installer, ensure that py launcher is selected.3 If you wish to run older versions of the randomizer prior to version 4.14, ensure that you also select tcl/tk and IDLE. Once you have the options you want selected, click Next. In the Advanced Options section of the installer, make sure that you have the Associate files with Python (requires the py launcher) checkbox selected, and the Add Python to environment variables checkbox selected.4 Once you have made sure these settings are selected, click Install. Once the install finishes, you can click the Close button.
-
1. Click this button. In this case the latest version was 3.8.2 but the version displayed for you is the one you want.
-
2. Choose to Customize installation.
-
3. Make sure that the py launcher checkbox is checked.
-
4. You want both Associate files with Python and Add Python to environment variables checked before clicking Install.


Downloading the Randomizer
It is strongly recommended to use the online generator instead of using the download or source code versions of the randomizer. If you are sure that you want to use a downloaded version, you can follow the instructions for the standalone download version or the source code and Dev version of the randomizer.
Standalone Download
You can choose to download the standalone download version of the randomzier by going to the downloads page on the website and choosing the appropriate download for your operating system. The provided installers should install the randomizer to the appropriate place for your operating system and you should be able to launch the randomizer from your operating system's application launcher—Start Menu in Windows, Applications folder in macOS, and whichever application launcher you prefer for Linux. You must have Python 3.6 or higher installed for the standalone download randomizer to work.
Once you have generated a randomizer ROM file, head to playing the randomizer.
Windows Troubleshooting

Often when a new version of the randomizer is released the standalone download is not trusted by the Windows operating system. When you try to run the installer it will pop up a Windows Smartscreen window. All you have to do is click More info and then the Run anyway button. The installer will then launch and install the randomizer.
Source Code
You can download either the release source code, or the development (Dev) branch source code to run the randomizer. Most users will want to use the standalone download for the release version, so this section will focus on running the latest development version from source code. You must have the latest Node.js LTS version and Python 3.6 or higher installed for the source code version of the randomizer to work.
Head to the website and in the navigation bar at the top, click on Resources and then choose the Dev Github option.1 Next click on the releases button to reach the page with all of the randomizer releases.2 Click on the zip button for the latest development version of the randomizer to download it.3 The Dev branch of the randomizer is known to be unstable. The latest version may not work properly. If you run into issues you may want to join the Discord server and ask which Dev version of the randomizer you should download.
Locate the zip file you just downloaded in your Downloads folder, or wherever you saved it. Right-click the file and click Extract All... and extract the files from the zip archive.4 A new folder should appear which may contain another folder inside. Open the folders until you see a folder with many folders and files inside. Locate the Gui.py file inside and Double-click it to launch the randomizer.5 The first time you run the randomizer many files need to be downloaded from the internet. Wait patiently as they download.6 This process will be faster every time you run the randomizer after this since it will only have to download the files once. Even if you download a new version it will be slightly faster as most of the files will be located in the Node.js cache and most will simply be used from there.
The randomizer will launch once the initial installation has finished. Once you have generated a randomizer ROM file, head to playing the randomizer.
-
1. Open the Dev Github link to open the GitHub page for the main fork of the randomizer.
-
2. The releases button will display all of the different randomizer versions.
-
3. A zip button should appear on the top release that you can click on.
-
4. On Windows, choose to Extract All... from the zip file.
-
5. Run the Gui.py Python script.
-
6. Wait patiently as Node.js downloads the randomizer's dependencies.


Playing the Randomizer
Emulators
The Ocarina of Time Randomizer can be played on PC via an emulator. Given the emulation quality difference between emulators, not every emulator can be recommended.
Recommended emulators are as follows:
Windows, Linux, macOS, and many others - Retroarch - Setup Guide
Windows - Bizhawk - Setup Guide
If you use Windows and your computer is not powerful enough to run either of the above to an acceptable level, then you may try Project64 - Setup Guide (v2.x)
Keep in mind that Project64 is not recommended as it is very inaccurate in its emulation, and has known compatibility issues with Ocarina of Time Randomizer. Project64 2+ is also banned for races and you will be disqualified if you race using it.
Patch Files
If someone shares a ZPF or ZPFZ file with you, these are Patch Files. They are a copyright-free method to share randomizer seeds with people. The patch files page will explain what to do with them.