(Embedded video) |
No edit summary |
||
| (49 intermediate revisions by 6 users not shown) | |||
| Line 1: | Line 1: | ||
It is | It is usually recommended to use the online generator on the website instead of the download or source code versions of the randomizer. The [[#Video Tutorial|video tutorial]] is also available as a walk through for the website. The [[Readme]] explains what the different options do. You can also check out the [[Changelog]] to see what changes have happened between randomizer versions. Recent [https://ootrandomizer.com/generatorDev Dev] and [https://ootrandomizer.com/generatorDev?version=devR_ Dev-R] versions are also available on the website. | ||
Ocarina of Time Randomizer is compatible with emulators, Wii Virtual Console, and original Nintendo 64 hardware. Learn more about these options in the [[#Playing the Randomizer|Playing the Randomizer]] section. | |||
Base files (ROMs, Wii common key, etc.) that are needed to play Ocarina of Time Randomizer are copyrighted and will not be provided by the community nor staff. | |||
''If you want to run the [https://ootrandomizer.com/downloads standalone download] version of the randomizer, you should skip to [[#Install Python|installing Python]].'' | |||
''If you want to run the [https://github.com/TestRunnerSRL/OoT-Randomizer/tree/master release source code] or [https://github.com/TestRunnerSRL/OoT-Randomizer/tree/Dev Dev source code] version of randomizer, you should skip to [[#Install Node.js|installing Node.js]].'' | |||
= | ''We have compiled [https://wiki.ootrandomizer.com/index.php?title=Common_Softlocks_And_Crashes a list of known softlocks and crashes]. It is recommended to read it through to potentially save you from frustration later.'' | ||
{{TOClimit|3}} | |||
== Online Generator == | |||
This section contains information similar to what is presented in the video by TreZc0, but does not go into as much detail regarding randomization options or emulator setup. The [[Readme]] and [[Setup#Emulators|emulator]] pages available to help with those details. The video is highly recommended, especially since it will provide visuals to aid in setup. | |||
=== Video Tutorial === | |||
<youtube dimensions="480x270">https://www.youtube.com/watch?v=7X0Le98C5Yc</youtube> | |||
Once you have viewed the video, generated a seed, and patched a randomizer ROM file, head to [[#Playing the Randomizer|Playing the Randomizer]]. | |||
=== Generating a Seed === | |||
The online randomizer does not require any downloads except for the final randomized rom, however you will be required to have one or more base files to create the randomized rom. Some of these are copyrighted files that you will need to have prior to receiving any help with setup in the {{discord|text=randomizer discord}}. Please read all rules of the discord and peruse the resources channel before requesting assistance there. | |||
* '''Always Required''' | |||
** OoT v1.0 NTSC-U/NTSC-J ROM - Copyrighted file | |||
** A device with a multicore CPU & at least 2GB of available ram | |||
*** Even most modern mobile devices (i.e. 2019 or newer) meet these requirements | |||
** A modern browser (2020 or later): Chrome, Firefox, Edge, Safari, or Opera | |||
** A method to play the game, which is covered later in the [[#Playing the Randomizer|Playing the Randomizer]] section. | |||
* '''Only Required for WiiVC/vWii/Dolphin''' | |||
** OoT v1.2 NTSC WAD - Copyrighted file | |||
** Wii Common Key - Copyrighted file | |||
Once prepared, go to https://ootrandomizer.com and click on the <samp><kbd>Play Now</kbd></samp> button for the latest stable version. | |||
[[File:Setup-Website-PlayNow.jpeg|none|thumb|Click the <samp>Play Now</samp> button on the website to open the online generator.]] | |||
Just below the "Ocarina of Time Item Randomizer v6.2" title is the button <samp><kbd>INSTRUCTIONS/HELP</kbd></samp> which effectively repeats the information available here and in the video at a quick glance. | |||
Detailed explanations of the settings can be found on the [[Readme]] page and quick tooltips can be seen by hovering over any setting in the generator. | |||
'''For a first seed, we recommend using either the Default/Beginner or Easy presets available on the "ROM Options" tab of the generator.''' The Default/Beginner preset is aimed at those familiar with vanilla who desire a similar progression. It uses base glitchless logic with no added tricks and no additional timesavers enabled (see the tab "Other" in the GUI). The world begins closed. Expect a long playthrough. The Easy Preset is aimed at those who have perhaps seen a few Randomizer runs previously and/or wish to dive right in. It uses base glitchless logic with no added tricks, but it does use additional timesavers (see the tab "Other" in the GUI). The world is more open after leaving Kokiri Forest. | |||
Once a preset is selected from the dropdown, click <samp><kbd>LOAD</kbd></samp> and all settings shown in the generator, except Cosmetics and SFX, will change to match the preset. Feel free to look at the other tabs to see which settings are enabled by each preset before deciding which to use. | |||
[[File:Presets.png|none|thumb|Presets location on the ROM Options tab of the generator.]] | |||
If you're feeling a little more bold, settings may still be changed from those loaded by the preset to any you desire. '''However''', on the first tab of the randomizer, ROM Options, please never disable "'''Create Spoiler Log'''." The Spoiler Log is a file containing all the item locations, settings, and entrances when applicable of the randomized seed. Though you may never look at it, it is vital for those helping in the randomizer discord to be able to check this log if you require help at any point in the seed. | |||
Once the settings are prepared, there are two options to generate the seed, <samp><kbd>GENERATE SEED!</kbd></samp> and <samp><kbd>GENERATE RACE SEED!</kbd></samp>. For most purposes, '''we highly recommend to only use the first option'''. Race seeds are encrypted and lock away the spoiler log even if it is generated. These locked logs will not be unlocked except for community races organized by the race mods. | |||
Seed generation takes, on average, 15 seconds but may be longer depending on the current workload of the website. Now you will be on the seed page. The URL follows the naming convention of "https://ootrandomizer.com/seed/get?id=680574" where the 6 digit ID at the end is unique to your seed. This is particularly useful for sharing seeds with friends or sharing the spoiler log when asking for help. (Note that the seed ID at the end of the URL is also present in the default file name of randomized roms. We recommend not changing rom names to keep this piece of information always with the seed.) | |||
Now it is time to direct the website to your base rom (OoT v1.0 NTSC-U/NTSC-J). The version is important, Rev A/B and MQ roms will not work. However, you can convert those ROMs to the proper one with the [https://oot.flagrama.com Ocarina of Time Downgrader and Converter]. For a normal N64 seed for use on everdrive or most emulators, leave the Output type toggle on <samp>.z64 (N64/Emulator)</samp> and browse to your rom file. For WiiVC/vWii/Dolphin, swap to <samp>WAD (WiiVC)</samp> and in addition to the Base Rom, also browse to your 1.2 WAD and Wii Common Key files. You can only patch a randomizer seed if you have the correct files given, so this is very important. | |||
This page also offers the option to change the cosmetics and SFX from those generated with the seed. Please be aware that if you set your desired cosmetics and SFX previously, the option "Override Original Cosmetics" should be disabled before patching the rom as it is enabled by default. | |||
[[File:Override_Cosmetics.PNG|none|thumb|Disable if cosmetics were previously set, enable if cosmetics are set on this page.]] | |||
Once everything is set, simply click <samp>PATCH ROM!</samp> The patching process uses your device's CPU, so how long this takes is dependent on your hardware. Once the process is complete, a download will begin. Save this new rom file separately from the original rom, and now it's time to proceed to the [[#Playing the Randomizer|Playing the Randomizer]] section. | |||
== Windows Setup == | |||
If you desire for any reason to use the offline randomizer program instead, you will need one or two other programs first. The randomizer itself will work on Windows, macOS, and Linux. The ROM will work on any device that has a Nintendo 64 emulator available. However, the following setup steps focus on getting the randomizer working on the Windows operating system. | |||
=== Install Node.js === | |||
As of version 4.14 of the randomizer, the source code versions of the randomizer require [https://nodejs.org/en/ Node.js] to be installed. (Please skip this step for the executable version of the randomizer found on [https://ootrandomizer.com/downloads the website's download page].) | |||
Open the [https://nodejs.org/en/ Node.js website] and click on the <samp><kbd>LTS</kbd></samp> button on their home page.<sup>1</sup> Save the <samp>msi</samp> installer file then, locate it in your <samp>Downloads</samp> folder, or wherever you saved it. Launch the installer by double-clicking it. Click <samp><kbd>Next</kbd></samp> until you get to the <samp>Tools for Native Modules</samp> screen. Make sure the <samp>Automatically install the necessary tools. [...]</samp> checkbox is '''not''' checked.<sup>2</sup> Click <samp><kbd>Next</kbd></samp> once you have made sure of this. Next click the <samp><kbd>Install</kbd></samp> button, then once that is completed, click the <samp><kbd>Finish</kbd></samp> button. | |||
<gallery> | |||
File:Setup-NodeJs-LTSButton.jpeg|1. Choose the <samp>LTS</samp> version which was <samp>12.16.2</samp> here, but may be different for you. | |||
File:Setup-NodeJs-NativeModulesUnchecked.jpeg|2. Make sure the checkbox is unchecked before clicking <samp>Next</samp>. | |||
</gallery> | |||
=== Install Python === | |||
To run the randomizer on your computer you will need to install [https://www.python.org Python]. This is not needed when using the [https://ootrandomizer.com online generator] but in all other cases you '''must''' have Python installed. The randomizer requires at least <samp>Python 3.9.0</samp> installed, however we recommend installing the latest stable version of Python available when you install it. | |||
Go to the [https://www.python.org Python website] and hover your mouse over the <samp>Downloads</samp> tab. A little dialog will appear and should have a <samp>Download for Windows</samp> section displayed. Click on the button labeled <samp>Python</samp> with a version number next to it.<sup>1</sup> Save the <samp>exe</samp> installer file, then locate it in your <samp>Downloads</samp> folder, or wherever you saved it. Launch the installer by double-clicking it. Click <samp><kbd>Install Now</kbd></samp> on the installer.<sup>2</sup> | |||
<gallery> | |||
File:Setup-Python-DownloadPythonButton.jpeg|1. Click this button. In this case the latest version was <samp>3.8.2</samp> but the version displayed for you is the one you want. | |||
File:Setup-Python-InstallNow.jpeg|2. Choose to <samp>Install Now</samp>. | |||
</gallery> | |||
== Downloading the Randomizer == | |||
Please ensure Node and/or Python are properly installed per the instructions above before downloading the randomizer. Once your computer is prepared, you can follow the instructions for the [[#Standalone Download|standalone download]] version or the [[#Source Code|source code and Dev]] version of the randomizer. | |||
=== Standalone Download === | |||
Download the current standalone download version of the randomzier by going to the [https://ootrandomizer.com/downloads downloads page on the website] and select the appropriate download for your operating system. The provided installers should install the randomizer to the appropriate place for your operating system and you should be able to launch the randomizer from your operating system's application launcher—Start Menu in Windows, Applications folder in macOS, and whichever application launcher you prefer for Linux. ''You must have [[#Install Python|Python 3.8 or higher]] installed for the standalone download randomizer to work''. | |||
Once you have generated a randomizer ROM file, head to [[#Playing the Randomizer|playing the randomizer]]. | |||
==== Windows Troubleshooting ==== | |||
[[File:Setup-Standalone-WindowsSmartScreen.jpeg|none|thumb|Click <samp>More info</samp> then <samp>Run anyway</samp> to run the installer.]] | |||
Often when a new version of the randomizer is released the standalone download is not trusted by the Windows operating system. When you try to run the installer it will pop up a Windows Smartscreen window. All you have to do is click <samp><kbd>More info</kbd></samp> and then the <samp><kbd>Run anyway</kbd></samp> button. The installer will then launch and install the randomizer. | |||
=== Source Code === | |||
You can download either the release source code, or the development (Dev) branch source code to run the randomizer. Most users will want to use the [[#Standalone Download|standalone download]] for the release version, so this section will focus on running the latest development version from source code. ''You must have the latest [[#Install Node.js|Node.js LTS version]] and [[#Install Python|Python 3.8 or higher]] installed for the source code version of the randomizer to work''. | |||
Head to the [https://ootrandomizer.com website] and in the navigation bar at the top, click on <samp><kbd>Resources</kbd></samp> and then choose the <samp><kbd>Dev Github</kbd></samp> option.<sup>1</sup> Next click on the <samp><kbd>releases</kbd></samp> button to reach the page with all of the randomizer releases.<sup>2</sup> Click on the <samp><kbd>zip</kbd></samp> button for the latest development version of the randomizer to download it.<sup>3</sup> ''The Dev branch of the randomizer is known to be unstable. The latest version may not work properly. If you run into issues you may want to join the {{discord|text=Discord server}} and ask which Dev version of the randomizer you should download''. | |||
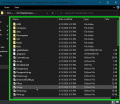
Locate the <samp>zip</samp> file you just downloaded in your <samp>Downloads</samp> folder, or wherever you saved it. <kbd>Right-click</kbd> the file and click <samp><kbd>Extract All...</kbd></samp> and extract the files from the zip archive.<sup>4</sup> A new folder should appear which may contain another folder inside. Open the folders until you see a folder with many folders and files inside. Locate the <samp>Gui.py</samp> file inside and <kbd>Double-click</kbd> it to launch the randomizer.<sup>5</sup> The first time you run the randomizer many files need to be downloaded from the internet. Wait patiently as they download.<sup>6</sup> ''This process will be faster every time you run the randomizer after this since it will only have to download the files once. Even if you download a new version it will be slightly faster as most of the files will be located in the Node.js cache and most will simply be used from there''. | |||
The randomizer will launch once the initial installation has finished. Once you have generated a randomizer ROM file, head to [[#Playing the Randomizer|playing the randomizer]]. | |||
<gallery> | |||
File:Setup-SourceCode-GitHubLink.jpeg|1. Open the <samp>Dev Github</samp> link to open the GitHub page for the main fork of the randomizer. | |||
File:Setup-SourceCode-GitHubReleases.jpeg|2. The <samp>releases</samp> button will display all of the different randomizer versions. | |||
File:Setup-SourceCode-GitHubZip.jpeg|3. A <samp>zip</samp> button should appear on the top release that you can click on. | |||
File:Setup-SourceCode-WindowsExtract.jpeg|4. On Windows, choose to <samp>Extract All...</samp> from the zip file. | |||
File:Setup-SourceCode-Gui-py.jpeg|5. Run the <samp>Gui.py</samp> Python script. | |||
File:Setup-SourceCode-InitialInstall.jpeg|6. Wait patiently as Node.js downloads the randomizer's dependencies. | |||
</gallery> | |||
==== Alternative Source Code Download Method ==== | |||
You can alternatively use [https://git-scm.com/ Git] to download the source code. This is the easiest way to keep up to date with the latest changes. We have a guide on using [[GitKraken]], a GUI for git that many of the developers use if you want to try to download the source code this way. You still need to install [[#Source Code|the other software mentioned above]]. | |||
== Playing the Randomizer == | |||
===Emulators=== | ===Emulators=== | ||
The Ocarina of Time Randomizer can be played on PC via an emulator. Given the emulation quality difference between emulators, not every emulator can be recommended. | |||
The emulators we support are available for free and have been extensively tested to work well with OoTR, assuming proper setup. | |||
[https://wiki.ootrandomizer.com/index.php?title=Project64 Project64 v3.0+] (Windows) is the least resource-intensive emulator and the easiest to setup. However, it is important that versions 3.0+ are used since these are currently the only ones that provide a stable game experience. Furthermore, '''<span style="color:red">please keep in mind that using Project64 v2.x for racing is against our community's racing rules</span>'''. | |||
[[Bizhawk]] (Windows) is the most resource-intensive, but easier to setup than RetroArch. Bizhawk is also the only race-legal emulator to support [[Multiworld]] currently. | |||
[https://wiki.ootrandomizer.com/index.php?title=Retroarch RetroArch] (Windows, macOS, Linux, and more) isn't as resource-intensive as Bizhawk. However, setting up RetroArch can be a frustrating experience, and especially so for certain controllers. | |||
[[Dolphin]] (Windows, macOS, and possibly Linux and Android) is capable of running OoTR through emulating Wii Virtual Console. As a result, it also has the Wii VC advantage of having less lag when opening the item menu. Other advantages include being lightweight and being easy to set up, especially with Gamecube controllers and either the official Nintendo or the Mayflash adapter. Downsides include random Wii VC crashes, having to inject the OoTR ROM into a WAD for every seed and additional lag in some areas (e.g. Market) due to shortcomings in how Wii VC is emulated. | |||
=== Wii Virtual Console === | |||
The Ocarina of Time Randomizer can be played on a [https://wiki.ootrandomizer.com/index.php?title=Wii_Virtual_Console Wii] (or [https://wiki.ootrandomizer.com/index.php?title=Wii_Virtual_Console#Playing_On_The_Wii_U.27s_Virtual_Wii Wii U]). The advantages are fast load times, less lag and improved graphics compared to the other options available. Some also prefer the stick sensitivity and deadzone settings of the Wii VC over that of pc emulators. The downsides are random (but extremely rare) crashes, installing new seeds is a longer process than on pc emulators, and potentially additional costs if you don't already own a Wii and/or compatible controllers or if you wish to stream your gameplay. | |||
=== EverDrive === | |||
The Ocarina of Time Randomizer can be played on a N64 by using the [https://wiki.ootrandomizer.com/index.php?title=Everdrive EverDrive]. Keep in mind that EverDrives are expensive and that the N64 is very laggy. The randomizer also requires the memory pak, even though base Ocarina of Time does not. | |||
== Patch Files == | |||
If someone shares a ZPF or ZPFZ file with you, these are [[Patch Files]]. They are a copyright-free method to share randomizer seeds with people. The [[Patch Files|patch files]] page will explain what to do with them. | |||
Latest revision as of 18:05, 21 March 2024
It is usually recommended to use the online generator on the website instead of the download or source code versions of the randomizer. The video tutorial is also available as a walk through for the website. The Readme explains what the different options do. You can also check out the Changelog to see what changes have happened between randomizer versions. Recent Dev and Dev-R versions are also available on the website.
Ocarina of Time Randomizer is compatible with emulators, Wii Virtual Console, and original Nintendo 64 hardware. Learn more about these options in the Playing the Randomizer section.
Base files (ROMs, Wii common key, etc.) that are needed to play Ocarina of Time Randomizer are copyrighted and will not be provided by the community nor staff.
If you want to run the standalone download version of the randomizer, you should skip to installing Python.
If you want to run the release source code or Dev source code version of randomizer, you should skip to installing Node.js.
We have compiled a list of known softlocks and crashes. It is recommended to read it through to potentially save you from frustration later.
Online Generator
This section contains information similar to what is presented in the video by TreZc0, but does not go into as much detail regarding randomization options or emulator setup. The Readme and emulator pages available to help with those details. The video is highly recommended, especially since it will provide visuals to aid in setup.
Video Tutorial
Once you have viewed the video, generated a seed, and patched a randomizer ROM file, head to Playing the Randomizer.
Generating a Seed
The online randomizer does not require any downloads except for the final randomized rom, however you will be required to have one or more base files to create the randomized rom. Some of these are copyrighted files that you will need to have prior to receiving any help with setup in the randomizer discord. Please read all rules of the discord and peruse the resources channel before requesting assistance there.
- Always Required
- OoT v1.0 NTSC-U/NTSC-J ROM - Copyrighted file
- A device with a multicore CPU & at least 2GB of available ram
- Even most modern mobile devices (i.e. 2019 or newer) meet these requirements
- A modern browser (2020 or later): Chrome, Firefox, Edge, Safari, or Opera
- A method to play the game, which is covered later in the Playing the Randomizer section.
- Only Required for WiiVC/vWii/Dolphin
- OoT v1.2 NTSC WAD - Copyrighted file
- Wii Common Key - Copyrighted file
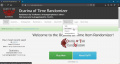
Once prepared, go to https://ootrandomizer.com and click on the Play Now button for the latest stable version.

Just below the "Ocarina of Time Item Randomizer v6.2" title is the button INSTRUCTIONS/HELP which effectively repeats the information available here and in the video at a quick glance.
Detailed explanations of the settings can be found on the Readme page and quick tooltips can be seen by hovering over any setting in the generator.
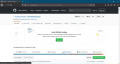
For a first seed, we recommend using either the Default/Beginner or Easy presets available on the "ROM Options" tab of the generator. The Default/Beginner preset is aimed at those familiar with vanilla who desire a similar progression. It uses base glitchless logic with no added tricks and no additional timesavers enabled (see the tab "Other" in the GUI). The world begins closed. Expect a long playthrough. The Easy Preset is aimed at those who have perhaps seen a few Randomizer runs previously and/or wish to dive right in. It uses base glitchless logic with no added tricks, but it does use additional timesavers (see the tab "Other" in the GUI). The world is more open after leaving Kokiri Forest.
Once a preset is selected from the dropdown, click LOAD and all settings shown in the generator, except Cosmetics and SFX, will change to match the preset. Feel free to look at the other tabs to see which settings are enabled by each preset before deciding which to use.

If you're feeling a little more bold, settings may still be changed from those loaded by the preset to any you desire. However, on the first tab of the randomizer, ROM Options, please never disable "Create Spoiler Log." The Spoiler Log is a file containing all the item locations, settings, and entrances when applicable of the randomized seed. Though you may never look at it, it is vital for those helping in the randomizer discord to be able to check this log if you require help at any point in the seed.
Once the settings are prepared, there are two options to generate the seed, GENERATE SEED! and GENERATE RACE SEED!. For most purposes, we highly recommend to only use the first option. Race seeds are encrypted and lock away the spoiler log even if it is generated. These locked logs will not be unlocked except for community races organized by the race mods.
Seed generation takes, on average, 15 seconds but may be longer depending on the current workload of the website. Now you will be on the seed page. The URL follows the naming convention of "https://ootrandomizer.com/seed/get?id=680574" where the 6 digit ID at the end is unique to your seed. This is particularly useful for sharing seeds with friends or sharing the spoiler log when asking for help. (Note that the seed ID at the end of the URL is also present in the default file name of randomized roms. We recommend not changing rom names to keep this piece of information always with the seed.)
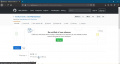
Now it is time to direct the website to your base rom (OoT v1.0 NTSC-U/NTSC-J). The version is important, Rev A/B and MQ roms will not work. However, you can convert those ROMs to the proper one with the Ocarina of Time Downgrader and Converter. For a normal N64 seed for use on everdrive or most emulators, leave the Output type toggle on .z64 (N64/Emulator) and browse to your rom file. For WiiVC/vWii/Dolphin, swap to WAD (WiiVC) and in addition to the Base Rom, also browse to your 1.2 WAD and Wii Common Key files. You can only patch a randomizer seed if you have the correct files given, so this is very important.
This page also offers the option to change the cosmetics and SFX from those generated with the seed. Please be aware that if you set your desired cosmetics and SFX previously, the option "Override Original Cosmetics" should be disabled before patching the rom as it is enabled by default.

Once everything is set, simply click PATCH ROM! The patching process uses your device's CPU, so how long this takes is dependent on your hardware. Once the process is complete, a download will begin. Save this new rom file separately from the original rom, and now it's time to proceed to the Playing the Randomizer section.
Windows Setup
If you desire for any reason to use the offline randomizer program instead, you will need one or two other programs first. The randomizer itself will work on Windows, macOS, and Linux. The ROM will work on any device that has a Nintendo 64 emulator available. However, the following setup steps focus on getting the randomizer working on the Windows operating system.
Install Node.js
As of version 4.14 of the randomizer, the source code versions of the randomizer require Node.js to be installed. (Please skip this step for the executable version of the randomizer found on the website's download page.)
Open the Node.js website and click on the LTS button on their home page.1 Save the msi installer file then, locate it in your Downloads folder, or wherever you saved it. Launch the installer by double-clicking it. Click Next until you get to the Tools for Native Modules screen. Make sure the Automatically install the necessary tools. [...] checkbox is not checked.2 Click Next once you have made sure of this. Next click the Install button, then once that is completed, click the Finish button.
-
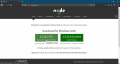
1. Choose the LTS version which was 12.16.2 here, but may be different for you.
-
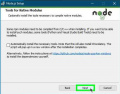
2. Make sure the checkbox is unchecked before clicking Next.


Install Python
To run the randomizer on your computer you will need to install Python. This is not needed when using the online generator but in all other cases you must have Python installed. The randomizer requires at least Python 3.9.0 installed, however we recommend installing the latest stable version of Python available when you install it.
Go to the Python website and hover your mouse over the Downloads tab. A little dialog will appear and should have a Download for Windows section displayed. Click on the button labeled Python with a version number next to it.1 Save the exe installer file, then locate it in your Downloads folder, or wherever you saved it. Launch the installer by double-clicking it. Click Install Now on the installer.2
-
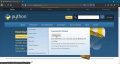
1. Click this button. In this case the latest version was 3.8.2 but the version displayed for you is the one you want.
-
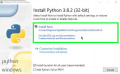
2. Choose to Install Now.


Downloading the Randomizer
Please ensure Node and/or Python are properly installed per the instructions above before downloading the randomizer. Once your computer is prepared, you can follow the instructions for the standalone download version or the source code and Dev version of the randomizer.
Standalone Download
Download the current standalone download version of the randomzier by going to the downloads page on the website and select the appropriate download for your operating system. The provided installers should install the randomizer to the appropriate place for your operating system and you should be able to launch the randomizer from your operating system's application launcher—Start Menu in Windows, Applications folder in macOS, and whichever application launcher you prefer for Linux. You must have Python 3.8 or higher installed for the standalone download randomizer to work.
Once you have generated a randomizer ROM file, head to playing the randomizer.
Windows Troubleshooting

Often when a new version of the randomizer is released the standalone download is not trusted by the Windows operating system. When you try to run the installer it will pop up a Windows Smartscreen window. All you have to do is click More info and then the Run anyway button. The installer will then launch and install the randomizer.
Source Code
You can download either the release source code, or the development (Dev) branch source code to run the randomizer. Most users will want to use the standalone download for the release version, so this section will focus on running the latest development version from source code. You must have the latest Node.js LTS version and Python 3.8 or higher installed for the source code version of the randomizer to work.
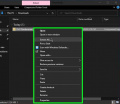
Head to the website and in the navigation bar at the top, click on Resources and then choose the Dev Github option.1 Next click on the releases button to reach the page with all of the randomizer releases.2 Click on the zip button for the latest development version of the randomizer to download it.3 The Dev branch of the randomizer is known to be unstable. The latest version may not work properly. If you run into issues you may want to join the Discord server and ask which Dev version of the randomizer you should download.
Locate the zip file you just downloaded in your Downloads folder, or wherever you saved it. Right-click the file and click Extract All... and extract the files from the zip archive.4 A new folder should appear which may contain another folder inside. Open the folders until you see a folder with many folders and files inside. Locate the Gui.py file inside and Double-click it to launch the randomizer.5 The first time you run the randomizer many files need to be downloaded from the internet. Wait patiently as they download.6 This process will be faster every time you run the randomizer after this since it will only have to download the files once. Even if you download a new version it will be slightly faster as most of the files will be located in the Node.js cache and most will simply be used from there.
The randomizer will launch once the initial installation has finished. Once you have generated a randomizer ROM file, head to playing the randomizer.
-
1. Open the Dev Github link to open the GitHub page for the main fork of the randomizer.
-
2. The releases button will display all of the different randomizer versions.
-
3. A zip button should appear on the top release that you can click on.
-
4. On Windows, choose to Extract All... from the zip file.
-
5. Run the Gui.py Python script.
-
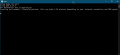
6. Wait patiently as Node.js downloads the randomizer's dependencies.


Alternative Source Code Download Method
You can alternatively use Git to download the source code. This is the easiest way to keep up to date with the latest changes. We have a guide on using GitKraken, a GUI for git that many of the developers use if you want to try to download the source code this way. You still need to install the other software mentioned above.
Playing the Randomizer
Emulators
The Ocarina of Time Randomizer can be played on PC via an emulator. Given the emulation quality difference between emulators, not every emulator can be recommended.
The emulators we support are available for free and have been extensively tested to work well with OoTR, assuming proper setup.
Project64 v3.0+ (Windows) is the least resource-intensive emulator and the easiest to setup. However, it is important that versions 3.0+ are used since these are currently the only ones that provide a stable game experience. Furthermore, please keep in mind that using Project64 v2.x for racing is against our community's racing rules.
Bizhawk (Windows) is the most resource-intensive, but easier to setup than RetroArch. Bizhawk is also the only race-legal emulator to support Multiworld currently.
RetroArch (Windows, macOS, Linux, and more) isn't as resource-intensive as Bizhawk. However, setting up RetroArch can be a frustrating experience, and especially so for certain controllers.
Dolphin (Windows, macOS, and possibly Linux and Android) is capable of running OoTR through emulating Wii Virtual Console. As a result, it also has the Wii VC advantage of having less lag when opening the item menu. Other advantages include being lightweight and being easy to set up, especially with Gamecube controllers and either the official Nintendo or the Mayflash adapter. Downsides include random Wii VC crashes, having to inject the OoTR ROM into a WAD for every seed and additional lag in some areas (e.g. Market) due to shortcomings in how Wii VC is emulated.
Wii Virtual Console
The Ocarina of Time Randomizer can be played on a Wii (or Wii U). The advantages are fast load times, less lag and improved graphics compared to the other options available. Some also prefer the stick sensitivity and deadzone settings of the Wii VC over that of pc emulators. The downsides are random (but extremely rare) crashes, installing new seeds is a longer process than on pc emulators, and potentially additional costs if you don't already own a Wii and/or compatible controllers or if you wish to stream your gameplay.
EverDrive
The Ocarina of Time Randomizer can be played on a N64 by using the EverDrive. Keep in mind that EverDrives are expensive and that the N64 is very laggy. The randomizer also requires the memory pak, even though base Ocarina of Time does not.
Patch Files
If someone shares a ZPF or ZPFZ file with you, these are Patch Files. They are a copyright-free method to share randomizer seeds with people. The patch files page will explain what to do with them.