|
|
| Line 1: |
Line 1: |
| <span style="font-size:x-small">'''Originally written by Tyrus'''</span> | | <span style="font-size:x-small">'''Originally written by Tyrus'''</span> |
|
| |
|
| Project64 is no doubt the most popular N64 emulator available. While you may think that this means it is the best emulator to use for Ocarina of Time Item Randomizer, you would unfortunately be mistaken. '''<span style="color:red">As racing is a large focus for the community you have to take stock of the rules of the racing websites which prohibit Project64 2.0 and higher.</span>''' | | Project64 is no doubt the most popular N64 emulator available. '''<span style="color:red">As racing is a large focus for the community you have to take stock of the rules of the racing websites which prohibit Project64 2.0 and higher.</span>''' Randomizer staff will support Project 64 '''v2.4.0-1161-g18d1867''' which was released on May 5, 2020 and versions newer than it. We will not directly support any previous version, including 2.3.2 which is the latest stable release. Make sure you download one of the nightly builds if you wish to use Project64 for the randomizer. |
|
| |
|
| If you're thinking "I don't race anyway, so I don't have to worry," unfortunately you are incorrect once more. Project64 has quite a few issues that are either game-breaking, or annoying to deal with. First, Project64 targets emulation speed over emulation accuracy which means it will take shortcuts when reading the game code and make assumptions. Some of these assumptions are no longer valid for the code randomizer uses instead and so will behave incorrectly, and even go as far as to crash. It is for these reasons that Ocarina of Time Item Randomizer support and staff do not recommend using Project64 and refuse to support it outside of exceptional cases.
| | [https://www.pj64-emu.com/nightly-builds Download Project64 nightly build] '''v2.4.0-1161-g18d1867''' release on May 5, 2020 or newer. |
|
| |
|
| If you want to try to use or race with Project64 1.6 or 1.7 anyway, you can [[#Pause Framebuffer Speed Fix|fix the pause menu delay]] without using a cheat which is allowed for races.
| | You can dismiss the nag screen without waiting 30 seconds by pressing the <kbd>Esc</kbd> key. |
|
| |
|
| The following settings for Project64 2.0+ seem to mitigate these issue as much as possible, but we do not guarantee you won't still run into issues. Issues with Project64 are not considered actual bugs for the randomizer and the developers are unlikely to try and fix these issues as many of them are unlikely to even be fixable without modification to Project64. All that being said, if you are using Project64 '''''You will have to complete [[#Unhandled Exception Error|fix unhandled exception error]] and [[#Pause Framebuffer Speed Fix|fix the pause menu delay]] steps for each and every newly randomized ROM you use on all versions of Project64, and [[#Crash Mitigations|crash mitigations]] on Project64 2.x'''''.
| | == Enable Memory Protect == |
|
| |
|
| [https://www.pj64-emu.com/ Download Project64]
| | Launch Project64, and in the menu bar navigate to <kbd><samp>Options</samp> ⇒ <samp>Settings...</samp></kbd> or press <kbd>Ctrl</kbd>+<kbd>T</kbd> to open the Settings menu. |
|
| |
|
| To get rid of the donate box that you have to wait 30 seconds for, click ‘Enter notification code’ and type “thank you from project64”.
| | In the Settings menu click on <samp>Options</samp> if nothing is displayed on the right side. Uncheck <samp>Hide advanced settings</samp>. Check <samp>Protect memory</samp> to enable it by default. This is required for Ocarina of Time to work correctly in Project64, but the randomizer isn't recognized as Ocarina of Time, so you have to set it yourself. |
| | |
| == Unhandled Exception Error ==
| |
| | |
| Open the ROM. You will get this error message:
| |
| | |
| [[File:PJ64 1.png]]
| |
| | |
| Click 'OK' and another error message will pop up:
| |
| | |
| [[File:PJ64 2.png]]
| |
| | |
| Click 'OK' once more, and then press <code>Ctrl + T</code> The following menu will appear:
| |
| | |
| [[File:PJ64 3.png]]
| |
| | |
| Untick 'Hide advanced settings' Then click on the 'Advanced' menu that just showed up.
| |
| | |
| [[File:PJ64 4.png]]
| |
| | |
| == Pause Framebuffer Speed Fix ==
| |
| | |
| Open the ROM Settings window using <code>Ctrl+T</code> and set "Counter Factor" to "1". This setting is not well tested at the moment. Use at your own risk.
| |
| | |
| == Crash Mitigation (2.x Only) ==
| |
| | |
| Click 'Config: THE LEGEND OF ZELDA' as seen in the image below. If it’s not there, load up the ROM and look again (Press Ctrl + T after dismissing the 2 error messages).
| |
| | |
| Where it says 'Memory size' go ahead and change that to 8 MB, deselect '32bit Engine' and then click 'apply' and 'OK'.
| |
| | |
| [[File:PJ64 5.png]]
| |
| | |
| Now click the + next to "config: THE LEGEND OF ZELDA" and then click "Recompiler" (as seen in the image below)
| |
| | |
| Deselect 'Cache', 'PI DMA', 'Start changed' and 'TLB unmapping'. Select 'Protect memory' and then click 'apply' and 'OK'.
| |
| | |
| [[File:PJ64 Setup Step 3.png]]
| |
| | |
| == Change Graphics Plugin (2.x Only Without Additional Setup) (Optional but recommended) ==
| |
| | |
| Press <code>Ctrl + T</code> and click 'Plugins' and change the Video (graphics) plugin to 'Glide64 for PJ64'. Click 'Apply' and then 'OK'.
| |
| | |
| [[File:PJ64 9.gif]]
| |
| | |
| == Restart Project64 ==
| |
| | |
| Once you have completed these steps, restart Project64 and open up your ROM.
| |
|
| |
|
| == Configure Controller == | | == Configure Controller == |
|
| |
|
| Click ‘Options’ and ‘Configure controller plugin’
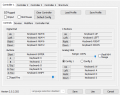
| | In the menu bar navigate to <kbd><samp>Options</samp> ⇒ <samp>Configure controller plugin...</samp></kbd> This is where you setup your controller binds.<sup>1</sup> The buttons on the left of a box refer to the button on an N64 controller and the box next to it displays which button on a controller is currently set for using it. |
| | |
| [[File:PJ64 11.png]]
| |
| | |
| Here is where you setup your controller binds.
| |
| | |
| For xbox controller users:
| |
| * In ‘Controller Pak’, untick ‘RawData’, and in the drop down menu, select ‘MemPak’.
| |
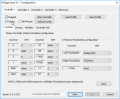
| * Tick ‘XInput’, and your binds menu will look like this: The ‘XControls’ correspond to the buttons on your controller, and ‘N64’ is what they will be bound to in-game.
| |
| | |
| [[File:PJ64 10.png]]
| |
| | |
| For keyboard users I recommend setting Analogue stick range to 100%, and in ‘Devices’, set ‘Gamepad Deadzone’ to 5%. These settings will make it easier to aim.
| |
| | |
| For users of any other controller my only recommendation is to check out the multitude of other guides on the Internet.
| |
| | |
| If you want to use a mouse, for some reason, tick 'N64 Mouse'.
| |
| | |
| ADDITIONAL HOTKEYS:
| |
| * Toggle limit fps (fast forward): f4
| |
| * Toggle pause: f2
| |
| * Save State: f5
| |
| * Load State: f7
| |
| | |
| == Required: Managing your Save data! ==
| |
| | |
| === Old versions of Project64 ===
| |
| | |
| Old versions of Project64 use the same '.sra' file for all OoT ROMS, regardless of if they're randomised or not. If you've loaded a vanilla ROM before loading a randomized ROM, then you must first delete 'THE LEGEND OF ZELDA.sra' in 'C:\Program FIles\Project64\Save'. ''Failure to do so will result in numerous gameplay bugs''.
| |
| | |
| If you do not load a vanilla ROM before loading a randomized ROM, you can just delete the save files in-game.
| |
| | |
| === Project64 v2.3.2 ===
| |
|
| |
|
| [[File:Project64 Save File Management.png|RTENOTITLE]]
| | If you are using an Xbox controller, or any controller that is an XInput device, ensure you check <samp>XInput</samp> at the top. This will change the bind menu to be more appropriate for your device.<sup>2</sup> The <samp>XControl</samp> column is the button on your controller, and the <samp>N64</samp> column is the button on the N64 controller you want it to use. |
|
| |
|
| Tick 'Unique game save directory' to avoid having to mess with the Save Files stored on your computer's HDD when switching to another Ocarina of Time ROM.
| | For other controllers and keyboard users, ensure <samp>XInput</samp> does not have a check by it. Click on the button for the control you want to bind a button to and the menu will wait for you to press a button on the controller or a key on your keyboard to use for the button. ''You may need to change these again if you switch controllers''. |
|
| |
|
| == Need additional assistance? ==
| | If you use a keyboard, you will also want to increase the <kbd><samp>Analog Stick</samp> ⇒ <samp>Range</samp></kbd> to <kbd>100%</kbd>. |
|
| |
|
| If you have any further issues, seek additional assistance on the [https://discord.gg/ootrandomizer Discord server]. Keep in mind Project64 is not a supported emulator and you likely won't get as much, nor as quality help as you would if you were using one of the supported emulators.
| | <gallery> |
| | File:PJ64 11.png|1. N-Rage Input configuration menu |
| | File:PJ64 10.png|2. XInput binds enabled |
| | </gallery> |
Originally written by Tyrus
Project64 is no doubt the most popular N64 emulator available. As racing is a large focus for the community you have to take stock of the rules of the racing websites which prohibit Project64 2.0 and higher. Randomizer staff will support Project 64 v2.4.0-1161-g18d1867 which was released on May 5, 2020 and versions newer than it. We will not directly support any previous version, including 2.3.2 which is the latest stable release. Make sure you download one of the nightly builds if you wish to use Project64 for the randomizer.
Download Project64 nightly build v2.4.0-1161-g18d1867 release on May 5, 2020 or newer.
You can dismiss the nag screen without waiting 30 seconds by pressing the Esc key.
Enable Memory Protect
Launch Project64, and in the menu bar navigate to Options ⇒ Settings... or press Ctrl+T to open the Settings menu.
In the Settings menu click on Options if nothing is displayed on the right side. Uncheck Hide advanced settings. Check Protect memory to enable it by default. This is required for Ocarina of Time to work correctly in Project64, but the randomizer isn't recognized as Ocarina of Time, so you have to set it yourself.
Configure Controller
In the menu bar navigate to Options ⇒ Configure controller plugin... This is where you setup your controller binds.1 The buttons on the left of a box refer to the button on an N64 controller and the box next to it displays which button on a controller is currently set for using it.
If you are using an Xbox controller, or any controller that is an XInput device, ensure you check XInput at the top. This will change the bind menu to be more appropriate for your device.2 The XControl column is the button on your controller, and the N64 column is the button on the N64 controller you want it to use.
For other controllers and keyboard users, ensure XInput does not have a check by it. Click on the button for the control you want to bind a button to and the menu will wait for you to press a button on the controller or a key on your keyboard to use for the button. You may need to change these again if you switch controllers.
If you use a keyboard, you will also want to increase the Analog Stick ⇒ Range to 100%.
-
1. N-Rage Input configuration menu
-