No edit summary |
|||
| (46 intermediate revisions by 8 users not shown) | |||
| Line 1: | Line 1: | ||
'''<span style="color:red">Please keep in mind that using texture packs during a race is against our community's racing rules.</span>''' | |||
{{TOClimit|3}} | |||
== Bizhawk == | |||
To apply texture packs in [[Bizhawk]] you need to do the following steps: | |||
# Start Bizhawk and open the '''N64 Plugin Settings''' | |||
# Select '''GLideN64''' and select the '''Texture''' settings tab | |||
# '''Enable''' the following options: | |||
#* HiresTextures/Texture Hires Enable | |||
#* Hires Full Alpha Channel/Texture Hires Full Alpha Channel | |||
#* Texture Cache Compression | |||
#* Save Texture Cache/Texture Save Texture Cache [[File:BizhawkTextureSettings.png|720px|thumb|center|How your settings should look '''(Old Bizhawk version)''']][[File:BizhawkTexturePluginSettingsV2.5+.png|thumb|center|720px|How your settings should look '''(New Bizhawk version)''']] | |||
= ''' | # Download your favourite texture pack for GLide64 in '''.htc format'''. (e.g. [http://www.emutalk.net/forums/134-Completed-Projects the completed packs on EmuTalk]) or see the [https://wiki.ootrandomizer.com/index.php?title=HiRes_Texture_Packs&action=submit#Rice-style_packs|instructions below for compiling your own using Project64]. | ||
# Make sure the filename of the downloaded pack is '''''THE LEGEND OF ZELDA_HIRESTEXTURES.htc''''' | |||
# Put the file in the following folder: <code>%UserProfile%\AppData\Roaming\Mupen64Plus\cache</code> | |||
#* If there is '''''no''''' cache folder, visit <code>UserProfile%\AppData\Roaming\Mupen64Plus\</code> and create one! | |||
[[File:BizhawkTexturePath.png|thumb|center|720px|Where your htc file should go.]] | |||
If done correctly you should immediately see the new textures. | |||
[[File:BizhawkTexturePackActive.png|thumb|center|720px|Now your texture pack should work!]] | |||
A future update to Bizhawk will add support for HTS texture packs (currently only HTC packs are supported) | |||
== RetroArch == | |||
For hi-res texture packs on [[Retroarch]], you will need to be running the '''Mupen64Plus''' core; ParaLLEL does not support them as it doesn't use the GLideN64 video plugin. | |||
#You will first need to obtain a compatible .HTC texture pack [http://www.emutalk.net/forums/134-Completed-Projects (e.g. from the completed projects section on emutalk)]. | |||
#Navigate to your RetroArch installation folder (By default, this is <code>%AppData%\RetroArch</code> on Windows) | |||
#Navigate to <code>.\system\Mupen64plus\cache</code> (create the cache folder if it doesn't exist) | |||
#Place your texture packs within the <code>cache</code> folder'''. The texture pack MUST be named "'''''<b>THE LEGEND OF ZELDA_HIRESTEXTURES.htc</b>'''''"''' | |||
#Load the ROM with the Mupen64Plus core selected | |||
#Finally, enable the option <code>Quick Menu -> Options -> Use High-Res textures</code> and <code>Use High-Res Full Alpha Channel</code> | |||
#Reload the content | |||
#You should now have your texture pack active. | |||
== Project64 == | |||
First, make sure you have the 3.0+ build of [https://www.pj64-emu.com/public-releases Project64.] | |||
Project64's GLideN64 plugin is needed to use texture packs. Project64 can use precompiled HTC texture packs like the other emulators, but it can also compile HTC texture packs from Rice-format texture packs (large collections of .PNG files). This process can also be used to create HTC texture packs for the other emulators to use. | |||
Launch Project64 and go to <code>Options > Settings > Plugins</code> and set your video/gfx plugin to the '''GLideN64''' option. Hit OK. | |||
* | Next go to <code>Options > Configure Graphics Plugin > Texture enhancement</code> and make sure the following options are enabled: | ||
* Use Texture Pack | |||
* Use full transparencies | |||
* Save enhanced texture cache to hard disk | |||
* Compress texture cache | |||
=== Precompiled .HTC Packs === | |||
Extract the .HTC to <code>\Project64\Plugin\GFX\GLideN64\cache\</code> and make sure its name is '''''THE LEGEND OF ZELDA_HIRESTEXTURES.htc''''' | |||
You should now be able to see the modified texture pack in-game. | |||
=== Compiling an HTC File from a Rice-format Pack === | |||
Extract the '''GAME NAME FOLDER''' (i.e. '''''THE LEGEND OF ZELDA''''') to <code>\Project64\Plugin\GFX\GLideN64\hires_texture\</code> | |||
Launch Project64. It may take a while for the GLideN64 cache file to be compiled. | |||
Once Project64 has successfully launched the game with the texture pack in question and the GLideN64 cache file has shown up in <code>\Project64\Plugin\GFX\GLideN64\cache\</code>, you can now safely delete the files from <code>\Project64\Plugin\GFX\GLideN64\hires_texture\</code> | |||
Revision as of 20:43, 26 July 2021
Please keep in mind that using texture packs during a race is against our community's racing rules.
Bizhawk
To apply texture packs in Bizhawk you need to do the following steps:
- Start Bizhawk and open the N64 Plugin Settings
- Select GLideN64 and select the Texture settings tab
- Enable the following options:
- HiresTextures/Texture Hires Enable
- Hires Full Alpha Channel/Texture Hires Full Alpha Channel
- Texture Cache Compression
- Save Texture Cache/Texture Save Texture Cache
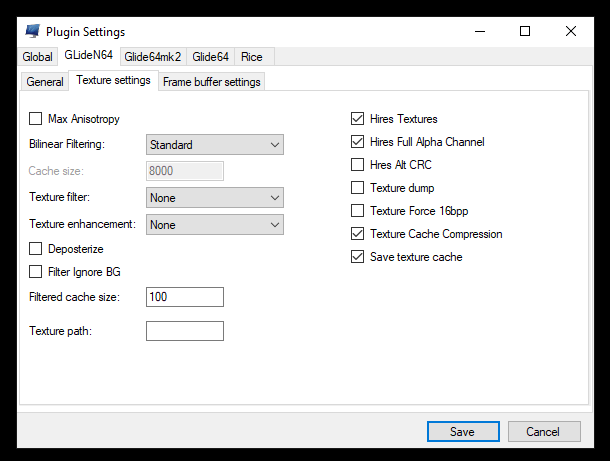
How your settings should look (Old Bizhawk version) 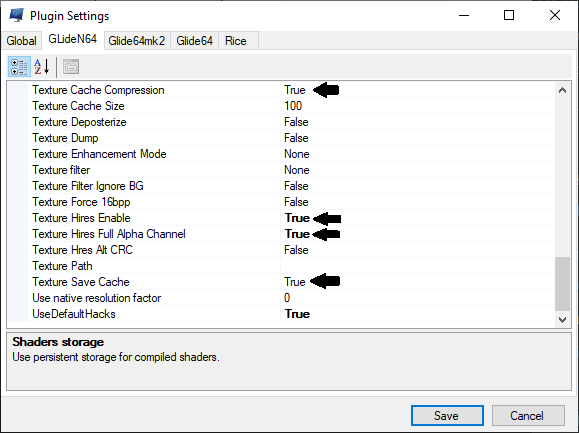
How your settings should look (New Bizhawk version)


- Download your favourite texture pack for GLide64 in .htc format. (e.g. the completed packs on EmuTalk) or see the below for compiling your own using Project64.
- Make sure the filename of the downloaded pack is THE LEGEND OF ZELDA_HIRESTEXTURES.htc
- Put the file in the following folder:
%UserProfile%\AppData\Roaming\Mupen64Plus\cache- If there is no cache folder, visit
UserProfile%\AppData\Roaming\Mupen64Plus\and create one!
- If there is no cache folder, visit

If done correctly you should immediately see the new textures.

A future update to Bizhawk will add support for HTS texture packs (currently only HTC packs are supported)
RetroArch
For hi-res texture packs on Retroarch, you will need to be running the Mupen64Plus core; ParaLLEL does not support them as it doesn't use the GLideN64 video plugin.
- You will first need to obtain a compatible .HTC texture pack (e.g. from the completed projects section on emutalk).
- Navigate to your RetroArch installation folder (By default, this is
%AppData%\RetroArchon Windows) - Navigate to
.\system\Mupen64plus\cache(create the cache folder if it doesn't exist) - Place your texture packs within the
cachefolder. The texture pack MUST be named "THE LEGEND OF ZELDA_HIRESTEXTURES.htc" - Load the ROM with the Mupen64Plus core selected
- Finally, enable the option
Quick Menu -> Options -> Use High-Res texturesandUse High-Res Full Alpha Channel - Reload the content
- You should now have your texture pack active.
Project64
First, make sure you have the 3.0+ build of Project64.
Project64's GLideN64 plugin is needed to use texture packs. Project64 can use precompiled HTC texture packs like the other emulators, but it can also compile HTC texture packs from Rice-format texture packs (large collections of .PNG files). This process can also be used to create HTC texture packs for the other emulators to use.
Launch Project64 and go to Options > Settings > Plugins and set your video/gfx plugin to the GLideN64 option. Hit OK.
Next go to Options > Configure Graphics Plugin > Texture enhancement and make sure the following options are enabled:
- Use Texture Pack
- Use full transparencies
- Save enhanced texture cache to hard disk
- Compress texture cache
Precompiled .HTC Packs
Extract the .HTC to \Project64\Plugin\GFX\GLideN64\cache\ and make sure its name is THE LEGEND OF ZELDA_HIRESTEXTURES.htc
You should now be able to see the modified texture pack in-game.
Compiling an HTC File from a Rice-format Pack
Extract the GAME NAME FOLDER (i.e. THE LEGEND OF ZELDA) to \Project64\Plugin\GFX\GLideN64\hires_texture\
Launch Project64. It may take a while for the GLideN64 cache file to be compiled.
Once Project64 has successfully launched the game with the texture pack in question and the GLideN64 cache file has shown up in \Project64\Plugin\GFX\GLideN64\cache\, you can now safely delete the files from \Project64\Plugin\GFX\GLideN64\hires_texture\